This article will take you through the steps of setting up a Rockford Fosgate DSR1 for use on a Harley Davidson sound system.
STEP 1 DOWNLOAD THE APP
If you haven't already done so, download the Rockford Fosgate "Perfect Tune" app from the app store. It is worth mentioning that connecting the app to your DSR1 by Bluetooth is done through the app and not through the Bluetooth menu. At least this is how it works on an iPhone. Simply tap the red Bluetooth icon at the bottom of the app.
STEP 2 SETUP AND PREFERENCES
Next go through the preference and device setup menus. To do this, tap the light blue "setup" button at the lower left side of your screen.

|
 |
Then Preferences will pop up with a button in orange. This will take you to a menu that will allow you to make the crossover plot overlay the EQ plot. This is a good idea because when using the EQ. That will allow you to see when using the EQ what frequency range is available.
Next hit the home button in the upper left corner. Then select the yellow "Setup Device" button.
IMPORTANT!
It is very important that you go through the setup wizard. To do this, tap the car/gear button at the upper right hand side of the screen in the "Device Setup" menu. This will take you through a series of questions that will dictate how your DSR1 functions.

|
The first Screen will ask you what kind of harness you will be using. Set this to "Universal". Then click "Ok, Got It" at the lower right corner. The second screen will ask you if you are using low or high level inputs. For most, the correct setting will be "High Level". Although if you have a CVO audio system, the radio will be flashed for two factory amplifiers and the audio level will be lower, so you may need to experiment with this setting. Note: Be sure that you do not overdrive the inputs of your DSR1. Speaker damage will likely result! The third screen will show you how to properly set the High/Low switch on the side of the DSR1. The fourth screen allows you to choose the input configuration. If you are using only the front two channels for input from your factory radio you will want this to be set for "Fronts Only". If you have had your bike flashed for 4 channel output you will want to set this to "Front + Rear". The next screen will show you how that configuration should be connected using RCAs to the DSR1. The sixth screen will allow you to choose your output configuration. This is where things get interesting. You can choose to have as many as EIGHT outputs! Why would you need 8 outputs?........ So that you can go active on your tweeters. That's why. Going active on your tweeters is when you dedicate amplifier channels to the tweeters. There are huge advantages to doing this. I will write an entire article about that very soon. Obviously you will need to have enough amplifier channels available to do this. If not, select an output configuration that matches the number of amplifier channels you do have. |

|
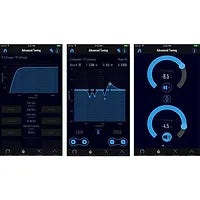
The last screen asks if you have a PLC2 connected. This is Rockfords volume knob that can be programmed for one of several functions (Subwoofer level, Punch Bass, Master Level). That's it for the setup wizard. About Subwoofer LevelYou don't have to use the subwoofer outputs of the DSR1 for subwoofers. I like to use them for the bag speakers. This way I have a handy level control that is dedicated to the bag speakers. I can turn them up or down as well as fade from front to back. The trick to using the subwoofer output for full range, bandpass, or high pass instead of low pass (subwoofer) is to set the crossovers for your desired function. I'll get to that here in a bit. STEP 3 BASIC OR ADVANCEDThe DSR1 gives you the the option of a basic EQ only interface or an advanced EQ/crossover/time alignment/and independent gain levels (referred to as "Trim Level" in the app). I am going to go ahead and assume that if you have read this far that you are interested in using the advanced option. If not, you should probably have a qualified professional set up your DSR1 for you. So, click the "Tune" button at the lower right hand corner of the home screen. |

|
Then choose Advanced. You will be presented with the 31 band EQ screen. First thing that you want to do is to look down at the bottom of the screen and tap the crossover button. |

|
This will present you with the crossover setting panel. Now there is a lot going on here, but it is all very straightforward, so stay with me here. In the center at the bottom of the screen (Green Finger) the crossover settings are highlighted in blue. to the left of each setting is the previous setting option (Yellow Finger) and to the right is the next possible setting option(Red Finger). Now I might just be dumb, but this took me a while to figure out. At the top in the graph you can see the effects of the crossover. As you can see here, this channel is crossed over at 100Hz with a slope of 48dB (very steep slope). |

|
Here are some round numbers to help you get started if you have never set crossover points before.
USING THE 31 BAND PARAMETRIC EQIn advanced mode the DSR1 sports a parametric EQ. This means that you can not only boost or cut any one of 31 frequency bands, but you can also choose the center frequency of each band as well as choose the "Q" value of that band (more about that below). WHAT THE HELL IS "Q" FACTOR?"Q" is an adjustment that allows you to change how much bandwidth each EQ adjustment has. Below you can see a comparison of the same EQ adjustment with two very different "Q" settings. Both screenshots show the same 18db cut at 1khz but with two different "Q" values. On the left the "Q" is set low (.420) this gives it a very wide effect. When using a low "Q" value many of the surrounding frequencies are affected. On the right the same adjustment is made but using a very high (narrow) "Q" factor. With a high "Q" value there is very little affect on surrounding frequencies. The center frequency of that EQ band is pretty much the only frequency range that is affected. |

HERE IS HOW TO SIMPLIFY CHOOSING A Q VALUE FOR A GIVEN BAND.
For low frequency adjustments to woofers you will typically use a higher "Q" value. The default "Q" value of 4.320 is a good value for minor adjustments at low frequencies.
At higher frequencies (tweeter range) a lower "Q" value is recommended. Sharp changes in frequency response at mid and high frequencies do not sound good. The way that humans process and perceive sound dictates that we are much less sensitive to dramatic changes in bass frequencies than we are to dramatic changes in higher frequencies.
A SIMPLE TRICK TO MAKING PRELIMINARY EQ SETTINGS
Use a second smartphone and download any one of a thousand free RTA apps. Also download a pink noise track.
An RTA is a device that displays a graph much like an EQ. It shows the frequency response of your sound system using your smartphone's built in mic.
Pink noise is a special soundtrack that sounds like FM static. It is a recording of random bursts 31 bands of frequencies all at equal levels. If your sound system was perfect (none are) all of the bars on the RTA would be level with each other and form a straight line across the screen. In the real world that never happens. Using the RTA app you will be able to see what frequencies need to be cut or boosted. This will help you identify problem areas and quickly make the correct adjustments using the DSR1 EQ.
Important Points To Remember
Make sure that you have the correct speakers selected when you make EQ or crossover adjustments. This is easy to miss. If you look at the top right corner of the screen you will see an icon of two speakers. Tapping this icon will bring you to the screen that allows you to select the speakers that you want to adjust.

|
 |
Adjust the gain of your speakers using the Trim menu that you can find at the lower left corner. Swipe the screen left or right to change speakers. |

If you have any questions or anything that you would like to see added to this article, feel free to contact us.
Firmware Updates