

What You Need to Know About Harley Radio Systems (Before You Buy Anything)
Harley radio systems have come a long way from simple AM/FM receivers bolted into a fairing. Today, riders can choose from factory-installed Boom! Box infotainment systems, handlebar-mounted SiriusXM satellite receivers, hidden antennas, and wireless Bluetooth headset modules — each with its own fitment rules, electrical requirements, and activation steps.
If you just want a quick answer, here's the short version:
The main Harley-Davidson radio and audio options are:
- Boom! Box 6.5GT / GTS — Factory touchscreen infotainment on 2014-later Touring models
- Premium Sound System (AM/FM/WB) — OEM fairing-mounted radio with handlebar controls
- SiriusXM Handlebar Mount (P/N 76390-05A) — Satellite radio with 170+ channels for Dyna, Softail, and older Touring models
- Wireless Headset Interface Module / WHIM (P/N 76000768) — Adds Bluetooth headset connectivity to factory radios
- Hidden AM/FM/WB Antenna (P/N 76000862) — Concealed antenna for a clean custom look on 2014-later Touring models
The catch? Every one of these accessories has strict model-year fitment rules, and several require extra wiring kits, specific torque specs, or a mandatory dealer software flash to activate.
This guide walks you through all of it — clearly and without the guesswork.
At American Hard Bag, we're a US-based manufacturer of premium hard bags and motorcycle accessories, and we've spent years helping riders navigate the compatibility maze of Harley radio upgrades and audio systems. Whether you're starting from scratch or trying to add wireless connectivity to an existing factory setup, we've got you covered in the sections below.
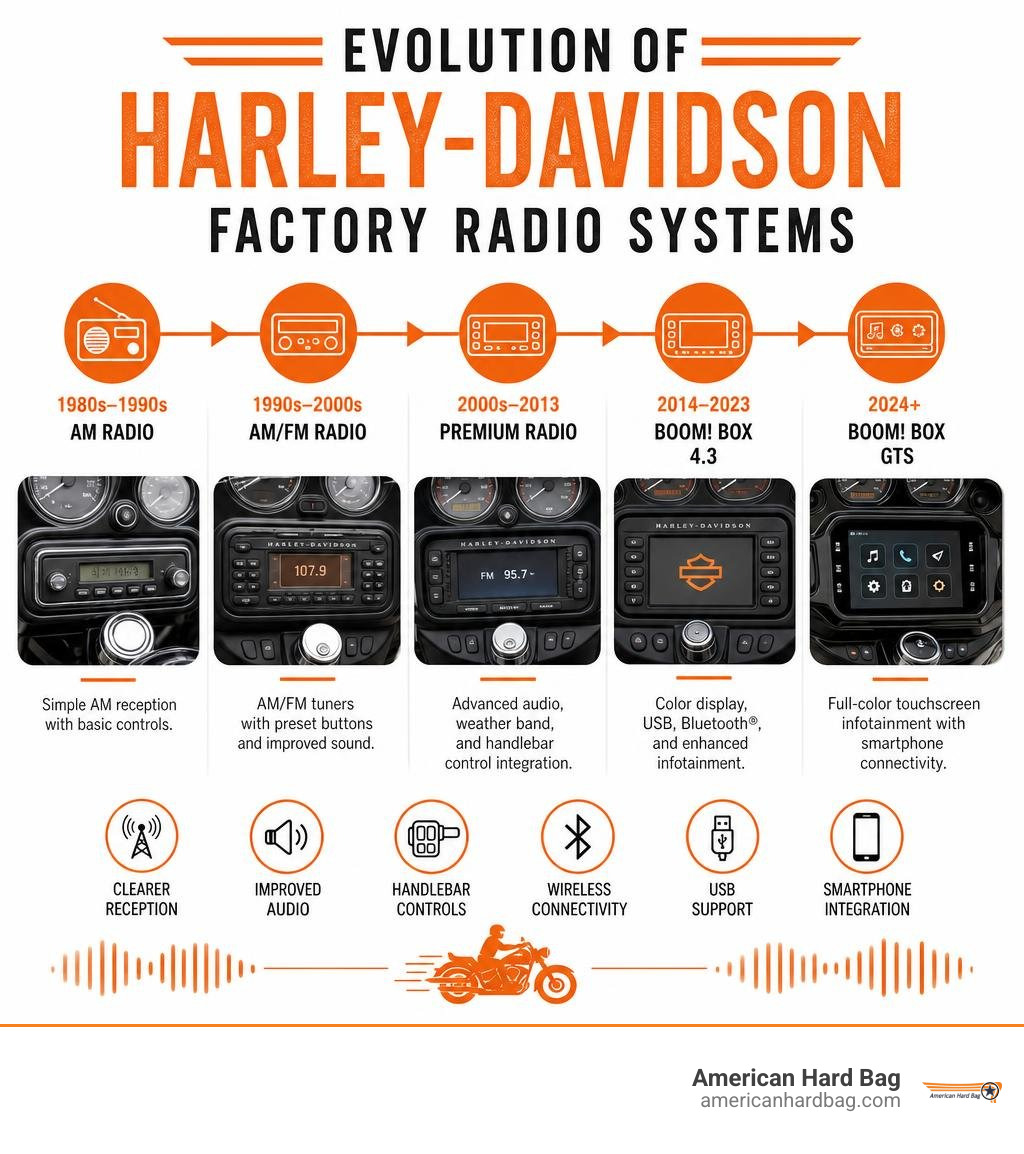
Types of Factory Harley Radio Systems and Audio Options
When evaluating your bike's audio setup, it is essential to understand what you are starting with. Harley-Davidson has utilized several generations of sound systems, ranging from traditional push-button receivers to high-tech touchscreen infotainment centers. For a deep dive into how these factory setups transition into high-performance aftermarket systems, check out our guide on Understanding Harley-Davidson Audio: From Factory Systems to Custom Setups.
Boom! Box Infotainment and Premium Sound Systems
For modern Touring riders, the center of the universe is the Boom! Box Infotainment system. Introduced with Project Rushmore in 2014, these units completely changed how we interact with our bikes.
- Boom! Box 6.5GT: This was the early standard for touchscreen navigation and audio on Touring models. It features a robust user interface, GPS navigation, and integration with the bike's handlebar controls.
- Boom! Box GTS: Introduced in later model years, the GTS offers a faster processor, a more vibrant glass screen, Apple CarPlay compatibility, and dramatically faster boot times.
- Premium Sound Systems (AM/FM/WB): These are the workhorse systems found on older or base-model Touring bikes. They lack the fancy touchscreens but deliver highly reliable AM/FM radio and weather band (WB) channels. These weather bands are crucial for long-distance touring, keeping you informed of sudden storms or road conditions.
SiriusXM Satellite Radio Options for Your Harley Radio
If you want to escape the limitations of local AM/FM signals, satellite radio is the ultimate upgrade. For riders on non-fairing bikes or older Touring rigs, the SiriusXM Satellite Radio - Handlebar Mount (Part Number 76390-05A) is a fantastic solution.
This waterproof receiver brings over 170 channels of music, news, sports, and talk radio directly to your handlebars. What makes this unit stand out is its physical design. It features oversized, glove-friendly buttons that allow you to change stations, browse categories, or adjust your settings without having to stop and pull off your riding gloves.
The receiver also includes an automotive adapter plate and a 12-volt power source. This means when you park your bike in the garage, you can easily slide the receiver out of its handlebar mount and transfer it to your daily-driver car using a separate vehicle kit. It also supports up to 20 pre-set stations, giving you quick access to your favorite channels.
Compatibility and Installation Requirements for a Harley Radio
Before you buy any new audio accessory, you need to verify fitment and prepare for the installation process. Adding electronic accessories to a motorcycle requires careful planning to avoid overloading the battery and charging system. For a complete breakdown of the hardware you will need, see our Ultimate Harley Audio Parts Guide.
Model and Year Fitment for Audio Accessories
Fitment varies wildly depending on the model and year of your motorcycle. To make sense of which accessories work with which bikes, we have to look closely at the frame and fairing designs. For example, 2014 was a massive transition year for Harley-Davidson electronics. You can learn more about these changes in our article on Factory Harley Radio Integration Secrets for 2014.
Below is a quick-reference compatibility table for common OEM audio accessories:
| Accessory | Part Number | Compatible Models & Years | Key Exclusions / Requirements |
|---|---|---|---|
| SiriusXM Handlebar Mount | 76390-05A | '96-'17 Dyna, '96-'24 Softail, '96-'13 Touring | Excludes '09-'13 Trikes, Softail FXFB/S and FXLRST. Requires model-specific Electrical Connection Kit. |
| Wireless Headset Interface (WHIM) | 76000768 | '14-later Touring and Trike | Excludes '23-later CVOs and '24-later standard models. Requires harness P/N 69201726 for '14-'17 models. |
| Hidden AM/FM/WB Antenna | 76000862 | '14-later Touring and Trike | Excludes '23-later FLHXSE/FLTRXSE, '24-later FLHX/FLTRX/STSE, and '25-later FLHXU/FLTRXRRSE. |
Required Installation Kits and Electrical Warnings
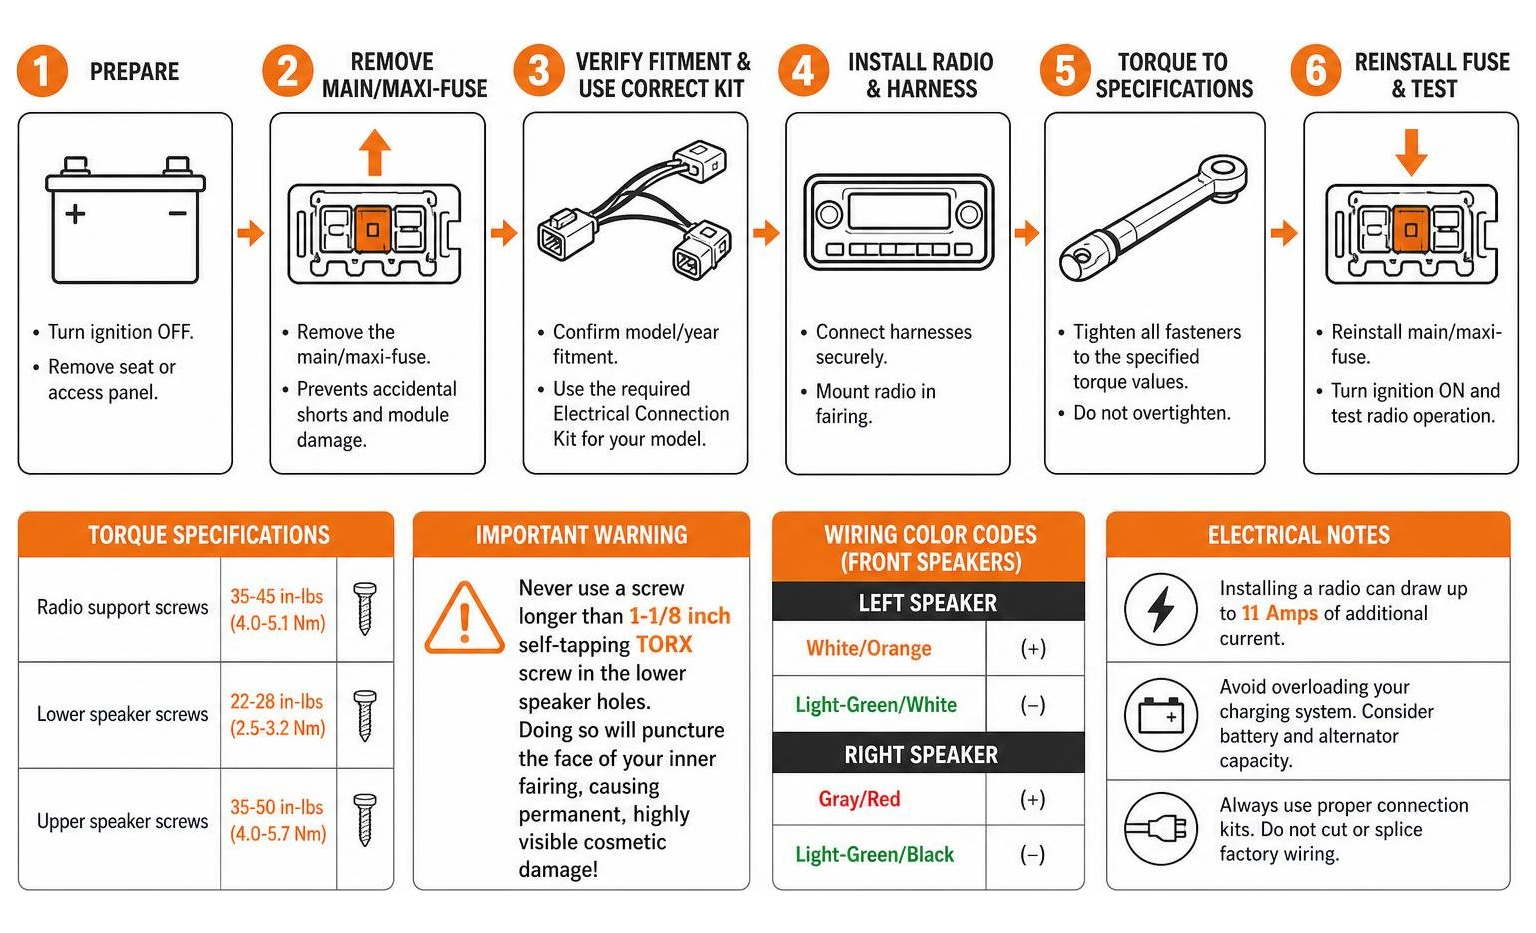
Adding a premium harley radio or audio kit is not always a simple plug-and-play affair. For instance, installing an OEM AM/FM radio kit can pull up to 11 Amps of additional current from your motorcycle's electrical system. If you run heated gear, auxiliary lights, and other high-draw accessories simultaneously, you risk overloading your charging system.
When installing these components, keep these critical safety and technical steps in mind:
- Remove the Main/Maxi-Fuse: Always pull the main fuse before touching any wiring to prevent accidental short circuits or damage to sensitive electronic modules.
- Electrical Connection Kits: Many models (such as '12-'17 Dyna and '11-'24 Softail) require a separate, model-specific Electrical Connection Kit (like P/N 72673-11 or P/N 69201750) to safely tap into the bike's wiring harness without cutting factory wires.
- Torque Specifications: When mounting a factory radio, tighten the support screws to 35-45 in-lbs (4.0-5.1 Nm).
- Speaker Installation and Fairing Protection: If you are installing or replacing fairing speakers, tighten the lower speaker screws to 22-28 in-lbs (2.5-3.2 Nm) and the upper screws to 35-50 in-lbs (4.0-5.7 Nm).
- Avoid Fairing Damage: Warning: Never use a screw longer than the specified 1-1/8 inch self-tapping TORX screw in the lower speaker holes. Doing so will puncture the face of your inner fairing, causing permanent, highly visible cosmetic damage!
-
Wiring Color Codes: If you are tracing wires inside the fairing, Harley's standard front speaker color coding is:
- Left Speaker: White/Orange (+) and Light-Green/White (-)
- Right Speaker: Gray/Red (+) and Light-Green/Black (-)
How to Operate and Tune Your Harley-Davidson Premium Sound System
Once your radio is installed, mastering its physical controls ensures you can safely adjust your audio while keeping your eyes on the road.
Setting the Clock and Powering Your Harley Radio
Setting the time-of-day on a classic Harley-Davidson Premium Sound System is straightforward, but it must be done in the correct power sequence:
- Turn your motorcycle's Ignition/Light Key Switch to the IGNITION or ACCESS position.
- Make sure the radio receiver itself is turned OFF.
- Press and hold the HRS button (which doubles as the Preset 2 button on some models, like the FLHTCU Ultra Classic) to change the hours.
- Press and hold the MIN button (Preset 3) to adjust the minutes.
The system features a power state memory. If the radio was turned on when you switched the bike off, it will automatically power back on when you next turn the key.
Tuning Modes, Presets, and Band Jump Controls
Finding and saving your music while riding is designed to be highly intuitive:
- Manual Tuning: Tap the tuning switch up or down. If you hold the switch for more than 1.5 seconds, the frequency will change continuously until you release it.
- Seek Tuning: Tap the tuning switch quickly to automatically find the next strong, listenable station.
- Scan Tuning: Press and hold the tuning switch to enter Scan mode. The radio will play each strong station for 10 seconds before moving to the next. To lock in a station, simply press the tuning switch again.
- Preset Memory: Each radio band (AM, FM1, FM2, WB) allows you to store up to 4 preset stations (giving you 8 total presets for FM). To save a station, tune to the desired frequency, then press and hold any of the four preset buttons for 1.5 seconds. The audio will briefly mute and then return, confirming the station is saved.
- Band Jump Feature: To quickly switch between your current radio station and your primary music source, press and hold the handlebar-mounted MODE SEL switch for 1 second. This will instantly jump you to the FM1 band (or an inserted CD if you have a legacy disc-playing unit).
AM vs. FM Reception and Stereo-to-Mono Blending
The physics of radio waves behave very differently on a moving motorcycle:
- AM Reception: AM radio waves bounce off the ionosphere, allowing them to travel up to 100 miles (160 kilometers). However, they are highly susceptible to electrical interference from your bike's ignition system, power lines, and nearby electrical storms.
- FM Reception: FM waves travel in straight, line-of-sight paths. While they offer superior audio fidelity and are free of electrical interference, they are limited by the physical horizon and can fade or flutter as you ride behind hills or tall buildings.
- Stereo-to-Mono Blending: To combat the "fluttering" sound of a fading FM signal, the Harley-Davidson Premium Sound System features an automatic blending system. As the stereo signal weakens, the radio smoothly blends the stereo separation down to mono. This reduces background hiss and maintains a stable, listenable signal.
- Automatic Bass Roll-Off: To protect your speakers from distortion and damage at high speeds, the radio automatically rolls off (reduces) the bass frequencies as you turn up the volume. Because of this, bass adjustments are much less noticeable when you are riding at highway speeds with the volume cranked up.

Advanced Wireless Integration and Hidden Antennas
As technology has evolved, riders want to eliminate cluttered cables and long whip antennas without sacrificing communication or reception.
The Wireless Headset Interface Module (WHIM)
The Wireless Headset Interface Module (P/N 76000768) is a game-changer for riders who want to cut the cord. This module mounts behind your fairing and integrates directly with the Boom! Box 6.5GT or GTS infotainment system.
Once installed, the WHIM allows you to wirelessly connect up to two Bluetooth-enabled headsets simultaneously. This gives both rider and passenger full access to CB radio communication, GPS navigation prompts, and voice commands.
However, there are two critical trade-offs you must know before buying the WHIM:
- Wired Microphone Disablement: Installing the WHIM completely disables your motorcycle's physical, wired microphone console. (Wired audio output to your speakers or wired headphones will still function normally, but you can no longer use a wired mic).
- The Mono Sound Restriction: Harley-Davidson restricts third-party (non-HD) Bluetooth headsets to mono-only sound output. If you want high-fidelity stereo sound, you must use an official, Harley-branded wireless headset (such as the Boom! Audio 50S or 50C).
Additionally, if you are installing the WHIM on a 2014-2017 Touring model, you will need to purchase an additional wiring harness (P/N 69201726). Deciding whether to tackle this install yourself or hand it to a professional? Read our guide on DIY vs Professional Installation: What You Need to Know About Upgrading Your Harley’s Audio.
Hidden AM/FM/WB Antenna vs. Whip Antennas
Traditional long metal whip antennas look fine on classic touring rigs, but they can ruin the clean, streamlined look of a custom bagger. They also get in the way when you are installing or removing detachable Tour-Pak luggage.
The OEM Hidden AM/FM/WB Antenna (P/N 76000862) solves this problem. It mounts completely out of sight inside your bike's fairing.
Unlike cheap aftermarket antennas that cause you to lose half of your favorite stations, this hidden antenna is specifically tuned to the Harley-Davidson radio frequency range. It delivers reception performance equivalent to your original equipment whip antenna, and it is significantly superior to "Shorty" antennas. By moving the antenna inside the fairing, you can completely eliminate the rear whip antenna, giving your custom bagger a clean, uncluttered profile.
Frequently Asked Questions About Harley Radio Systems
Do I need a dealer flash to install a new Harley radio or accessory?
Yes. If you are installing an OEM Advanced Audio radio kit, the Wireless Headset Interface Module (WHIM), or upgrading your speakers and amplifiers, a trip to an authorized dealer is mandatory. Harley-Davidson uses a proprietary computer-based diagnostic system called Digital Technician to flash and activate these electronic modules. Without this dealer flash, your newly installed accessories may not function, or your audio output will sound thin and distorted.
To understand how radio flashing affects your sound quality when upgrading your speakers, check out our Ultimate Harley Radio Flash Guide for Aftermarket Speakers and Amplifiers.
What are the warranty and subscription terms for Harley SiriusXM?
Official Harley-Davidson audio accessories, including the SiriusXM Handlebar Mount, come with a 1-year limited warranty from the date of purchase. To receive satellite radio programming, you must purchase a separate monthly or annual subscription directly from SiriusXM.
Why does my non-Harley Bluetooth headset only play in mono through the WHIM?
This is a software restriction built into the Harley-Davidson firmware. To protect their proprietary ecosystem and encourage riders to buy official Harley-branded wireless headsets, the system limits any third-party Bluetooth headset (such as standard Sena or Cardo units) to a low-fidelity mono audio channel. To get full, high-quality stereo sound, you must use a Harley-branded wireless headset.
Conclusion
Finding the right harley radio setup is all about matching your riding style with the correct, compatible parts. Whether you are adding a handlebar-mounted SiriusXM receiver to your Softail, tucking away a hidden antenna inside your Street Glide's fairing, or cutting the cord with a wireless headset module, paying close attention to fitment rules and electrical requirements will save you hours of frustration in the garage.
If your factory system isn't delivering the volume, clarity, or modern features you want on the open highway, we can help. At American Hard Bag, we specialize in designing premium, plug-and-play audio upgrades specifically engineered for Harley-Davidson Touring motorcycles.
Ready to build the ultimate sound system for your bike? Explore The Ultimate Guide to Upgrading Your Harley Davidson’s Audio System and take your riding experience to the next level.