

Why Your Harley's Factory Audio Isn't Cutting It at Highway Speed
A harley saddlebag audio upgrade is one of the most impactful changes you can make to your touring bike. At 70 mph, wind and engine noise swallow most of what your stock speakers can produce - and over 70% of riders who upgrade cite highway-speed clarity as their number one reason for making the switch. For context, CDC/NIOSH guidance on noise exposure explains that prolonged exposure to high sound levels can contribute to hearing loss, which is why clean, efficient audio matters more than simply turning the volume to maximum.
Here's the quick answer - the fastest path to better saddlebag audio on a 2014+ Harley touring model:
- Choose your speaker size - 5x7" (drop-in), 6x9" (cut-in or lid swap), or 8"+ (custom enclosure)
- Pick your kit type - plug-and-play replacement, cut-in kit, or full speaker + amp bundle
- Match your amplifier - factory amp works for basic upgrades; dedicated 4-channel amp unlocks full performance
- Install and seal - use the included cutting template, plug-and-play harness, and gasket seal for weather protection
- Configure your radio - some 2014+ systems require a factory radio flash before aftermarket speakers will perform correctly
Most plug-and-play kits can be installed in about an hour with basic hand tools. Full cut-in speaker lid upgrades take a bit longer but deliver significantly better bass and volume.
The difference between a stock Boom! Audio setup and a well-matched aftermarket system isn't subtle. Riders consistently report up to double the mid-bass output after switching to quality 6x9" saddlebag speakers paired with a dedicated amplifier. Whether you've blown a stock speaker after a long rally week or you're just tired of turning the volume to maximum and still barely hearing your music - this guide walks you through every step.
At American Hard Bag, we're a US-based manufacturer of premium hard bags and motorcycle accessories, and we've built our product line specifically around what touring riders need for a clean, high-performance harley saddlebag audio upgrade. From speaker lids to wire harnesses and sealed enclosures, we know what works on the road - not just on the workbench.
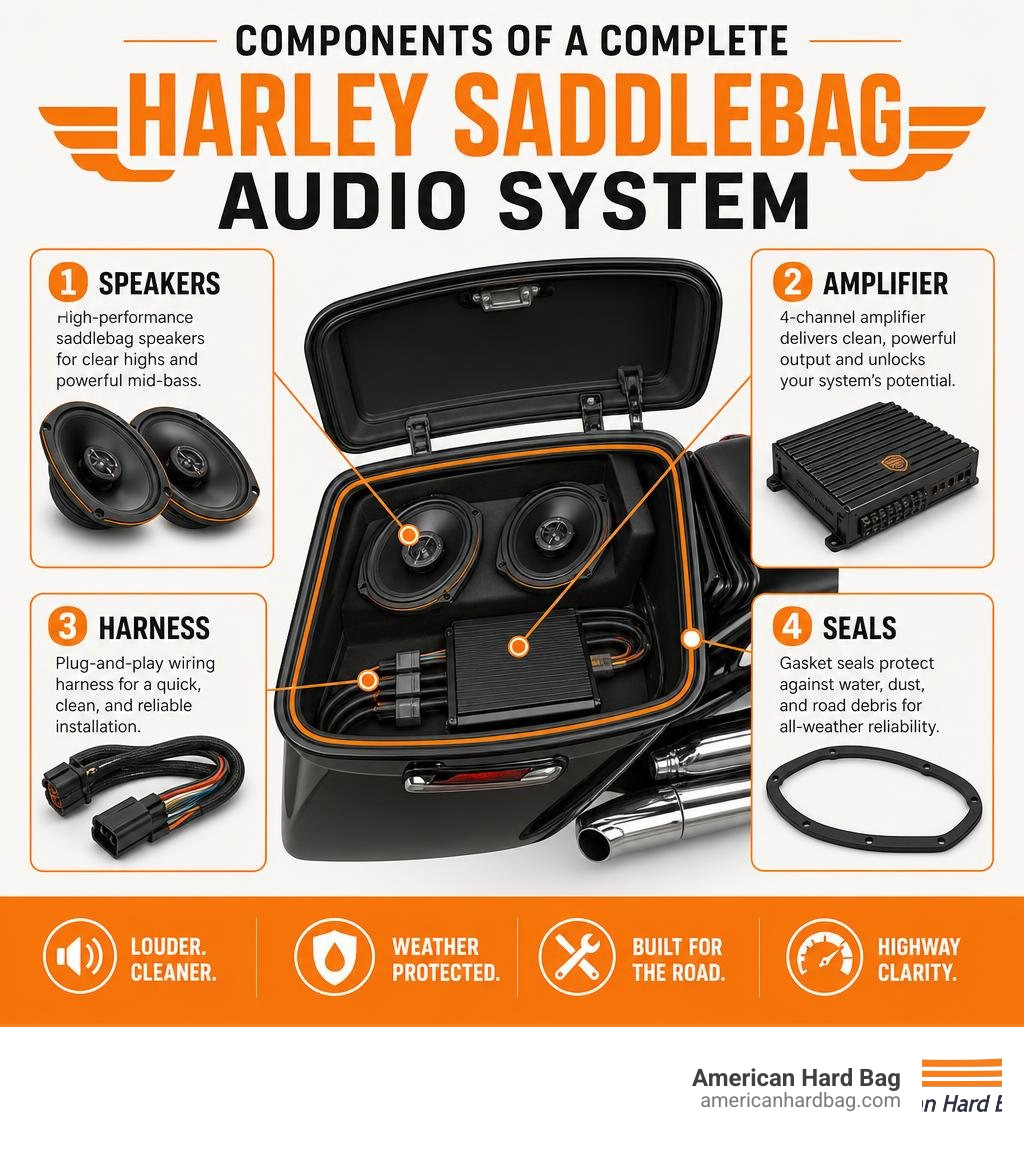
Choosing Your Harley Saddlebag Audio Upgrade
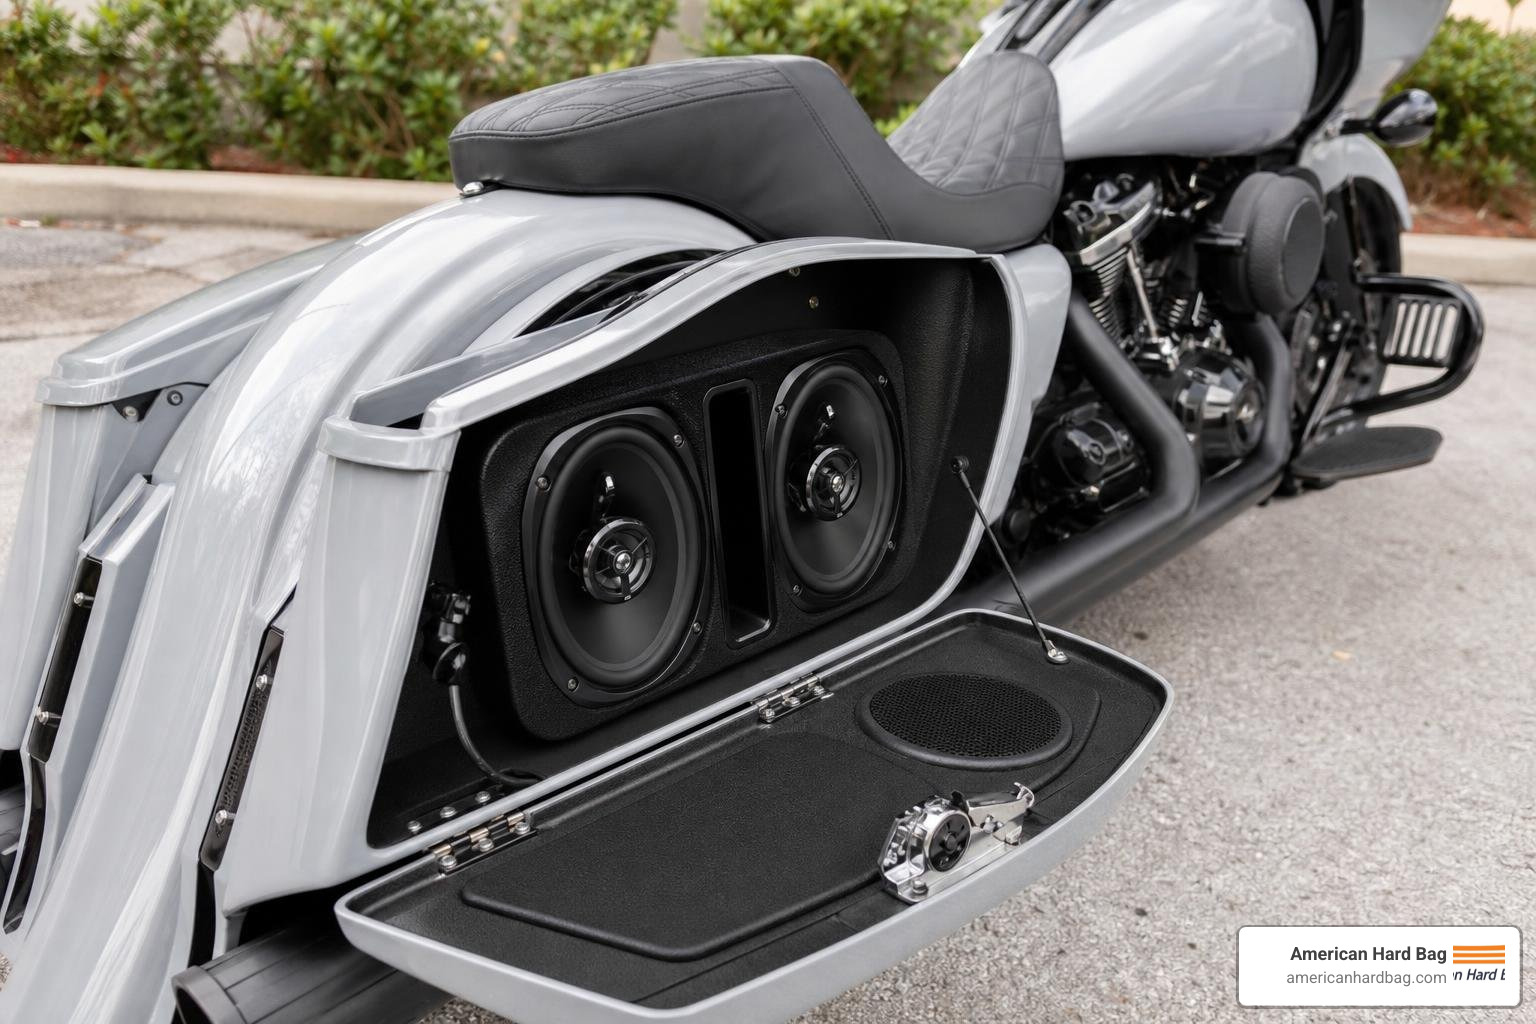
When mapping out your harley saddlebag audio upgrade, the first fork in the road is deciding how you want to physically mount the speakers to your bike. There are two primary avenues: upgrading your existing factory lids using a cut-in template kit or replacing the lids entirely with aftermarket speaker lids.
The global motorcycle audio market is projected to reach $1.2 billion by 2028, and a massive driver of this growth is the demand for premium aftermarket upgrades like saddlebag speaker kits. Harley-Davidson touring models (Street Glide, Road Glide, Ultra, and Road King) make up over 60% of aftermarket motorcycle audio sales in the United States, meaning there is an incredibly rich ecosystem of parts designed specifically for these bikes.
To help you visualize the differences between the most common configurations, we have broken down the three primary speaker sizes used in saddlebag lids today:
| Speaker Size | Cone Area | Mid-Bass Potential | Installation Difficulty | Lid Modifications Needed |
|---|---|---|---|---|
| 5x7" | Small | Low to Moderate | Easy (Drop-in for OEM lids) | None (if replacing factory 5x7") |
| 6x9" | Medium-Large | High | Moderate | Cut-in template or aftermarket lid |
| 8" (or dual 8") | Very Large | Extreme | Advanced | Custom heavy-duty lids & inner bag rings |
Selecting the Right Speaker Size for Your Harley
The physical size of your speaker directly dictates its cone area, which in turn determines how much air the speaker can move. In the motorcycle environment, moving air translates to mid-bass response.
- 5x7" Speakers: Historically, many factory premium Harley systems (like the Boom! Audio Stage I and II) utilized 5x7" speakers. While they are relatively easy to replace with drop-in aftermarket options, they have a smaller cone area. They struggle to deliver deep mid-bass at highway speeds.
- 6x9" Speakers: The 6x9" speaker is widely considered the sweet spot for a harley saddlebag audio upgrade. They offer significantly more cone area than a 5x7", delivering a rich, punchy low-end that you can actually feel while cruising down the highway.
- 8" and 10" Woofers: For the ultimate parking lot showstopper or extreme highway performance, some riders step up to massive 8-inch or 10-inch pro-audio drivers. These systems require heavy-duty reinforced lids and specialized internal mounting rings to handle the weight and vibration of the larger magnets.
To find the perfect match for your bike, you can Explore aftermarket Harley-Davidson audio upgrade kits that fit your specific model year and performance goals.
Plug-and-Play vs. Cut-In Harley Saddlebag Audio Upgrade Kits
If your Harley did not come with factory saddlebag speakers, you have two choices: buy brand-new pre-painted speaker lids, or use a high-quality cut-in kit on your existing factory lids.
Purchasing pre-painted aftermarket lids is convenient, but matching Harley’s factory paint — especially custom CVO colors or hard-to-replicate metallic flakes — can be incredibly expensive and time-consuming.
This is why cut-in kits have exploded in popularity. A premium cut-in kit includes a highly accurate physical template that overlays your factory saddlebag lid. You use this template to trace and cut a precise opening using a jigsaw or air saw. The kit then provides a stylish, weather-tight mounting bezel and a protective metal grille that clamps sandwich-style over the cut opening.
This approach preserves your perfect factory paint, saves hundreds of dollars in paint-matching costs, and creates an incredibly strong, structural mount. However, to get the absolute best performance out of a 6x9" cut-in kit, you must manage the air volume inside the bag. Uncontrolled air movement inside a large, open saddlebag can cause the speaker cone to over-excurse, leading to distortion and potential damage. For More info on sealed backs for 6x9s, you can see how sealing the rear of the speaker protects your gear and tightens up the bass.
Amplifier Integration and Power Requirements
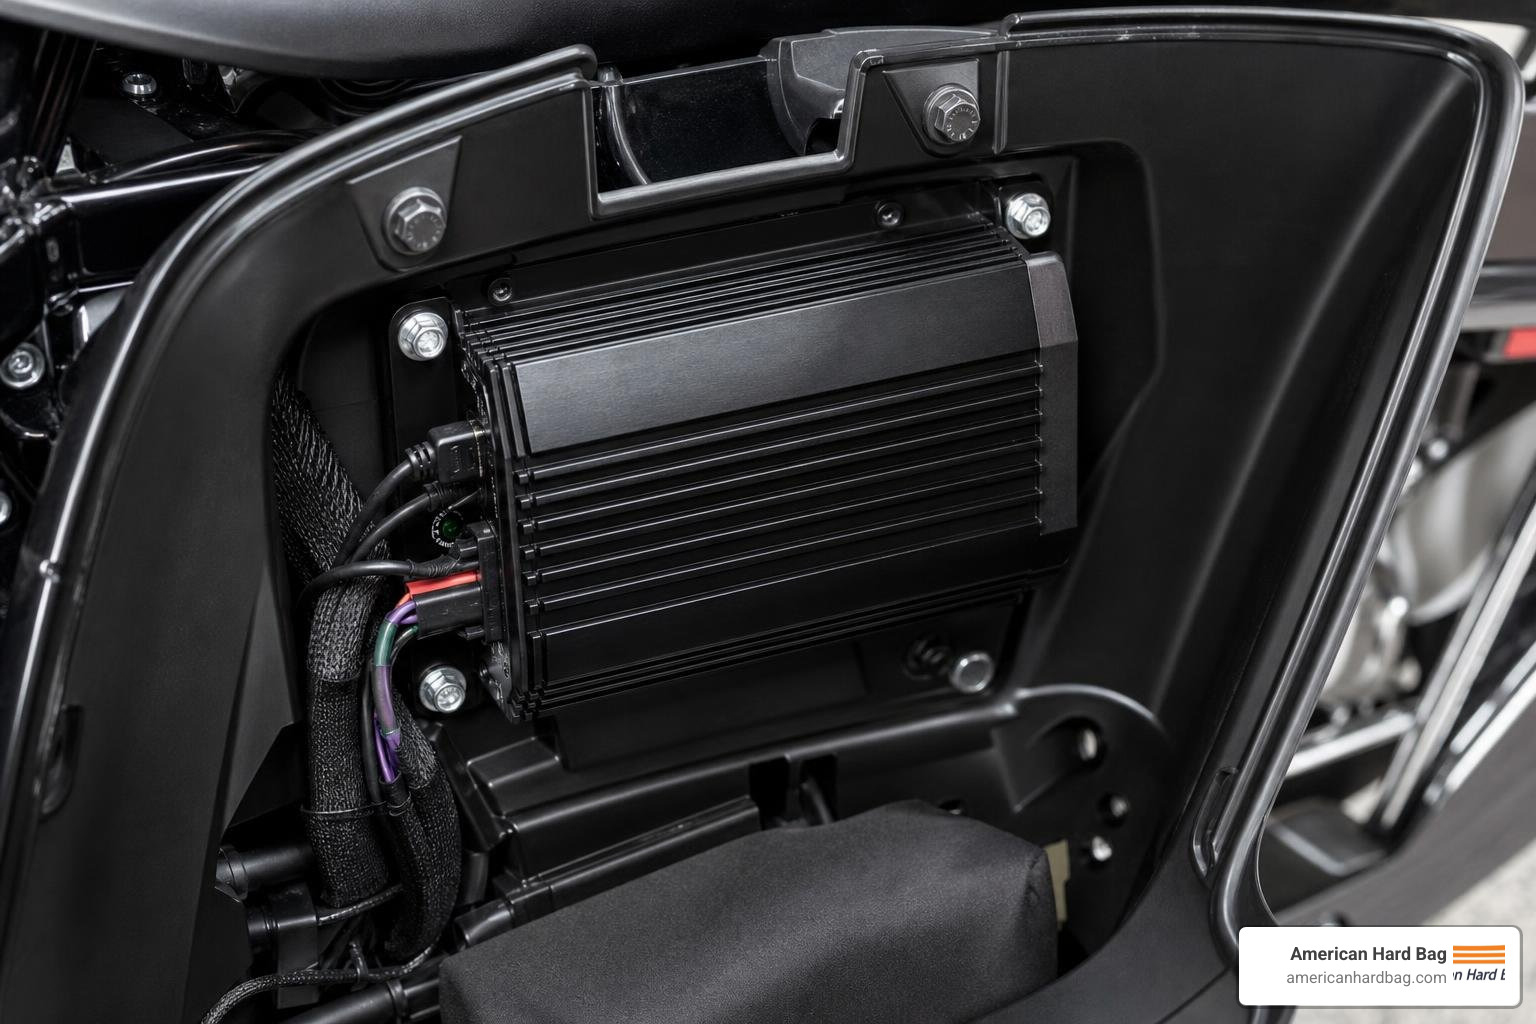
Adding high-performance saddlebag speakers to your Harley without upgrading your amplifier is like putting a lawnmower engine inside a muscle car. It might move, but it won't perform.
Modern motorcycle audio upgrades rely heavily on compact, high-efficiency Class D amplifiers. Unlike traditional car audio amplifiers (Class A/B), which run hot and draw massive amounts of current, Class D amplifiers are highly efficient. They convert almost all of their power into raw audio output while drawing minimal current from your bike's charging system and producing very little heat. This allows them to be tucked neatly inside your front fairing or even mounted on a specialized plate inside your saddlebag.
Matching Your Amp to Your Saddlebag Speakers
To get the most out of your new speakers, you must match the amplifier's power output (measured in Watts RMS) and impedance (measured in Ohms) to your speakers' specifications.
Most premium aftermarket motorcycle speakers are rated at 4 Ohms or 2 Ohms. If you are running a 4-channel amplifier, you will typically run your front fairing speakers off channels 1 and 2, and your newly installed saddlebag speakers off channels 3 and 4.
If you are upgrading from a factory Boom! Audio Stage II system, be aware that the factory system uses a complex "bi-amp" configuration where the tweeter and woofer are powered by separate channels. When transitioning to high-performance aftermarket gear, we generally bypass this setup in favor of a high-power, full-range Class D amplifier.
Additionally, your factory Harley-Davidson radio has a highly aggressive, pre-programmed equalizer (EQ) curve designed to make cheap factory speakers sound acceptable at low speeds. When you plug high-power aftermarket speakers into an unflashed factory radio, this EQ curve can cause severe distortion and even destroy your new speakers. Flashing your factory radio to a flat EQ curve is an essential step in any premium install. You can Learn more about premium bagger audio specialists to see how we help riders navigate the radio flashing process and select the perfect high-efficiency amplifier for their setup.
Wiring Harnesses for a Clean Harley Saddlebag Audio Upgrade
The unsung hero of any great motorcycle audio system is the wiring harness. A poorly constructed harness leads to interference, signal loss, and intermittent connection issues as your bike vibrates down the road.
When upgrading your saddlebags, you need a harness that is highly durable, properly shielded, and — most importantly — quick-detachable. At some point, you will need to remove your saddlebags for maintenance, tire changes, or detailing. A high-quality harness features heavy-duty, waterproof quick-disconnect plugs right at the front of the saddlebag, allowing you to unplug and slide the bags off in seconds without touching your amplifier wiring.
Several specialized harnesses exist to make this process seamless:
- To run clean power and signal from your front fairing all the way to the rear bags, learn How to install a saddlebag amplifier wire harness.
- For advanced multi-speaker setups, check out our Guide to split backbone rear speaker wire harness.
- If you are running a high-power system that requires independent routing for left and right channels, see the Instructions for WH-SBB2 and WH-SBB4 harnesses.
- For maximum power transfer in dual-amplifier or extreme woofer setups, look into the VWH-4CHSBB Velocity 8 Saddlebag Harness.
Installation Steps and Weatherproofing Best Practices
Installing a saddlebag audio kit is a highly rewarding DIY project. If you are comfortable using basic hand tools and a saw, you can achieve professional-grade results right in your own garage.
Before you start cutting or bolting, make sure you have the necessary tools on hand:
- Jigsaw or pneumatic air saw (for cut-in kits)
- Variable-speed drill with pilot bits
- Masking tape (to protect your paint)
- Torque wrench (calibrated in inch-pounds)
- High-grade marine silicone adhesive
- Safety glasses and a dust mask
Cutting and Mounting Your Speaker Lids
If you are using a cut-in kit, the key to success is preparation. Start by thoroughly cleaning your saddlebag lids and applying several layers of high-quality masking tape across the entire cutting area. This tape prevents the footplate of your saw from scratching your paint during the cut.
Position the template precisely as instructed by the manufacturer, double-checking your clearances on the underside of the lid. Once you are confident in the placement, drill your pilot holes and slowly make your cuts.
When mounting the speaker bezel, always use a sandwich clamping gasket design. Apply a thin bead of marine-grade silicone adhesive or the included environmental gasket seal between the bezel and the lid. This ensures that no rainwater or road spray can seep past the mounting hardware and into your bags. When securing the speaker screws, always adhere to the manufacturer's torque specifications (typically between 10 to 15 inch-pounds) to prevent cracking the plastic or stripping the threads.
For riders stepping up to larger, high-performance bass setups, you can refer to the Velocity 10 Razor woofer installation guide for a detailed breakdown of mounting heavy-duty drivers.
Sealing and Porting for Maximum Mid-Bass
A speaker needs a solid, sealed environment to produce clean mid-bass. If air escapes around the edges of the speaker or through gaps in the saddlebag latch mechanism, you will lose a massive amount of low-end response.
To combat this, professional installers use specialized bag seals to make the saddlebag lid interface completely air-tight. Some high-end systems also utilize bass reflex technology, which incorporates tuned port kits (like a 3-inch port) directly into the saddlebags. This allows the back wave of the speaker to escape in a controlled manner, dramatically increasing the efficiency and output of the woofer without sacrificing weather resistance.
To understand how to balance these air pressures and get the absolute most punch out of your system, read How to set up Razor subwoofer systems.
Frequently Asked Questions about Harley Saddlebag Audio
Do I need to flash my factory Harley-Davidson radio when upgrading saddlebag speakers?
Yes. If you are keeping your factory Harley-Davidson head unit (especially on 2014+ models), you must flash the radio. The factory radio has an aggressive internal EQ curve designed to protect thin, low-power factory speakers. When paired with high-power aftermarket amplifiers and speakers, this curve will cause severe distortion, harsh highs, and muddy bass. Flashing the radio resets the EQ curve to a flat output, allowing your new amplifier and speakers to perform exactly as they were engineered.
Can I keep my factory amplifier when upgrading to aftermarket saddlebag speakers?
While it is technically possible in some limited configurations (such as using specialized 2-ohm drop-in replacement speakers on a Boom! Stage II system), we highly recommend upgrading to a dedicated aftermarket amplifier. Factory Harley amplifiers have built-in crossovers and power limitations designed strictly for OEM speakers. An aftermarket Class D amplifier provides the clean, high-wattage power required to make aftermarket speakers truly shine at highway speeds.
How do I protect my saddlebag speakers from rain and road debris?
Premium motorcycle-specific speakers are designed with weather resistance in mind. Look for speakers that feature IPx5 or higher weather ratings, UV-resistant pressed paper or carbon fiber cones, and hydrophobic mesh grilles. The hydrophobic mesh allows sound waves to pass through freely while causing water droplets to bead up and roll away, keeping the delicate voice coils completely dry even in heavy downpours.
Conclusion
Upgrading your Harley's saddlebag audio is the absolute best way to create a rich, full-range "surround sound" experience on the open road. By choosing the right speaker size, pairing them with a high-efficiency Class D amplifier, and taking the time to properly seal and wire your system, you can achieve unmatched highway-speed clarity that will put a smile on your face every time you twist the throttle.
At American Hard Bag, we are dedicated to helping riders design and build the ultimate motorcycle audio systems. Whether you are looking for a simple plug-and-play upgrade or a ground-up custom build, we have the American-engineered components and expert support to help you get it done right the first time.
Ready to plan your build? Read the ultimate guide to upgrading your Harley-Davidson audio system and take the first step toward waking up the neighbors!