

Comparing Every Harley Touring Lower Fairing Style and Design
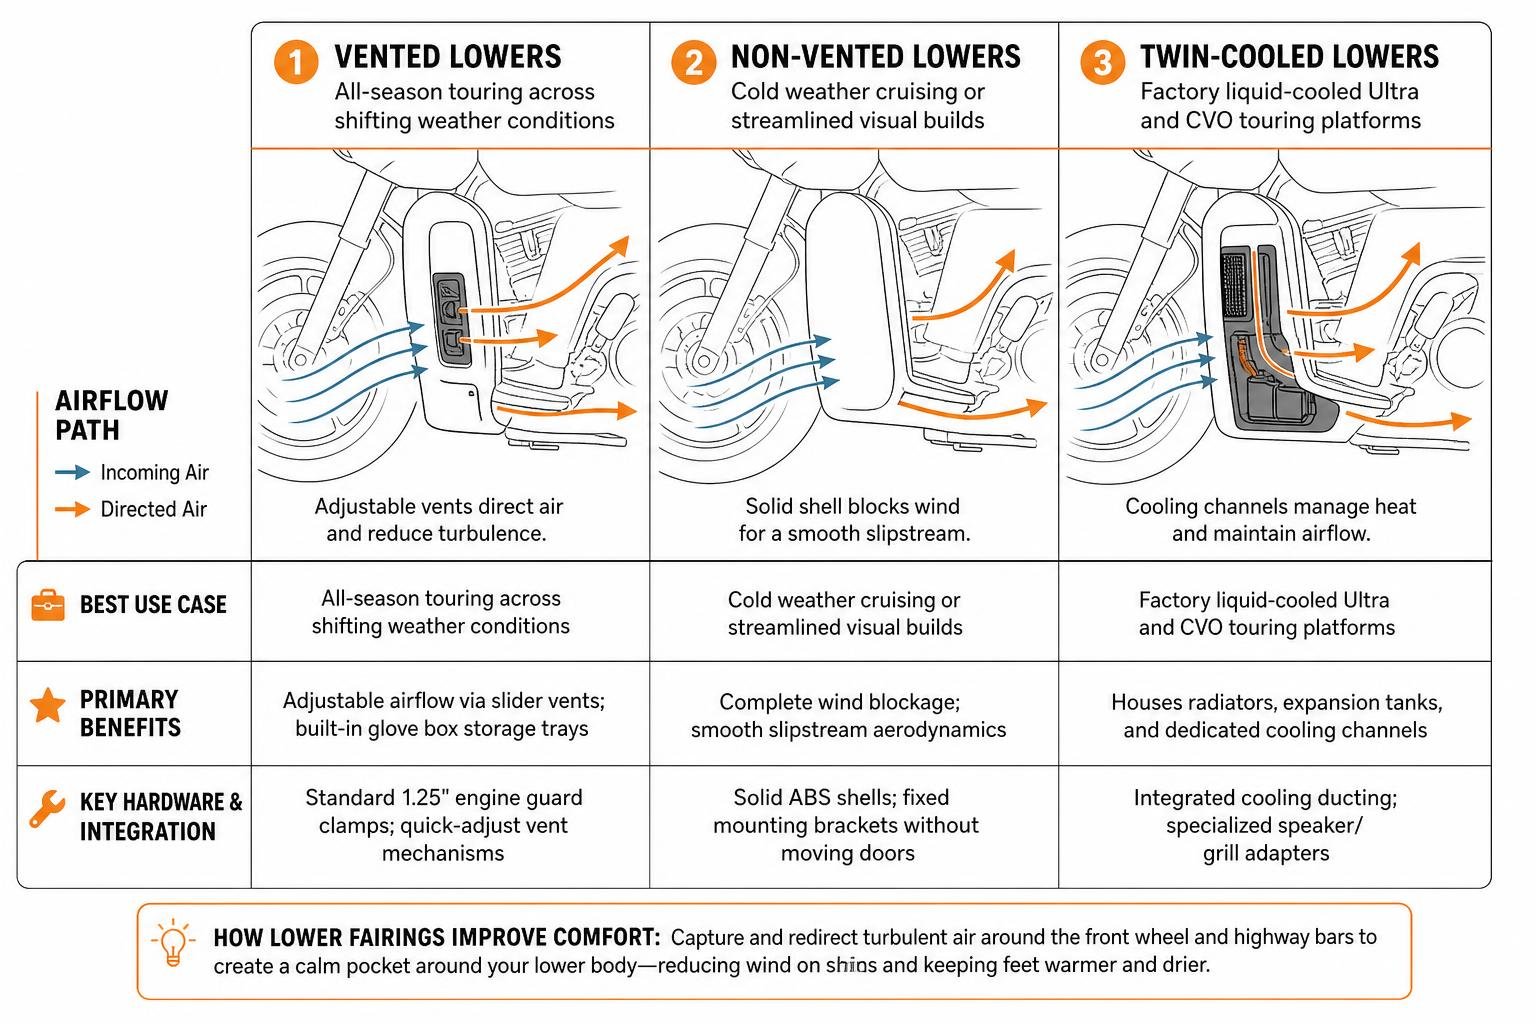
When you spend long hours in the saddle, airflow management is everything. Lower fairings change the aerodynamic footprint of your bike by capturing and redirecting the turbulent air that churns around your front wheel and highway bars. Instead of letting buffeting wind whip against your shins and push into your floorboards, lower fairings slice through the air to create a calm pocket around your lower body.
Lower fairings are typically manufactured from injection-molded, impact-resistant ABS plastic. This material is light enough to keep front-end handling nimble while offering enough structural integrity to withstand flying gravel, tire spray, and extreme heat cycles from the engine. Selecting the right setup requires balancing weather versatility, cooling demands, and interior storage. For a broader look at how motorcycle fairings manage airflow, motorcycle fairing design has evolved around the same principles of drag reduction and rider protection.
| Fairing Style | Best Use Case | Primary Benefits | Key Hardware & Integration |
|---|---|---|---|
| Vented Lowers | All-season touring across shifting weather conditions | Adjustable airflow via slider vents; built-in glove box storage trays | Standard 1.25" engine guard clamps; quick-adjust vent mechanisms |
| Non-Vented Lowers | Cold weather cruising or streamlined visual builds | Complete wind blockage; smooth slipstream aerodynamics | Solid ABS shells; fixed mounting brackets without moving doors |
| Twin-Cooled Lowers | Factory liquid-cooled Ultra and CVO touring platforms | Houses radiators, expansion tanks, and dedicated cooling channels | Integrated cooling ducting; specialized speaker/grill adapters |
Choosing the Right Harley Touring Lower Fairing for Your Riding Climate
For riders who travel through fluctuating temperatures, vented lowers are the standard choice. These assemblies feature adjustable vent sliders that open or close with a thumb lever. In the heat of midsummer, sliding the vents fully open routes air directly past your boots and across the primary and transmission covers, dissipating engine heat while keeping you comfortable.
When you ride into unexpected mountain rain or cold morning air, closing the vent sliders creates an unbroken weather barrier. They deflect water spray away from your feet, reducing road grit and keeping boot leather dry. For riders who want factory-level finishes, options like color-matched fairing lowers provide this climate control while matching OEM factory paint.
Non-Vented and Airduct Aerodynamic Profiles
If you ride primarily in cooler regions or prefer a smooth, minimalist aesthetic, non-vented lower fairings eliminate moving parts altogether. These shells offer uninterrupted surface contours that reduce drag and steady the front end at high cruising speeds.
Some contemporary aerodynamic fairings also use fixed airduct profiles. These built-in channels passively direct highway air around the rider’s legs without complex mechanical doors, offering a clean, lightweight look that still cuts down on high-speed drag.
Harley-Davidson Touring Fitment, Model Years, and Hardware Exceptions
Lower fairing fitment depends on the engine guard architecture and frame geometry of your specific bike. Most aftermarket and OEM lower fairings are engineered around full-size 1.25-inch factory crash bars on Touring platforms spanning 1994 through 2026, including Street Glide, Road Glide, Road King, and Electra Glide models.
Recent Touring redesigns, such as the fairing lowers in Iron Horse Metallic for 2024–2026 models, use revised contours to complement updated fairing shapes. Understanding your motorcycle's front-end geometry avoids fitment headaches:
- Chopped Engine Guards: "Low-profile" or "chopped" crash bars lack the vertical height and lower clamping points necessary to secure a standard lower fairing shell. You must swap to a full-size engine guard to install lowers.
- Mustache Engine Guards: Built-in footrest bends on mustache bars interfere with the inner walls of lower fairing shells.
- Heavy Breather and Performance Intakes: Forward-facing, cone-style air cleaners often collide with the glove box backing on the right-side fairing lower, requiring low-profile backing plates or alternative air cleaners.
- Footboard and Highway Peg Spacing: Ensure your floorboards sit at least 1.5 inches away from the crash bar clamps so your shift linkage and brake pedal move freely without contacting the fairing edges.
Air-Cooled vs. Twin-Cooled Compatibility
Standard air-cooled bikes rely on the hollow interior of the lower fairing for glove box storage or high-output audio upgrades. Twin-Cooled touring platforms (such as the Ultra Limited and select CVO models) use that internal fairing cavity to house liquid cooling radiators, cooling lines, and electric fans.
Because the radiator takes up the traditional glove box space, standard aftermarket lowers and conventional drop-in speaker pods will not fit. When upgrading sound on a liquid-cooled bike, specialized Liquid Twin Cooled Lower Fairing Speaker Pods are required to clear the internal plumbing while directing sound toward the rider. Freewheeler and Trike models also require specific lower mounting brackets to anchor the lower fairing shells securely around trike-specific steering dampeners and chassis bracing.
Factory Color-Matching vs. Raw Unpainted Finishes
Choosing between painted and unpainted fairings comes down to budget and your custom paint plans:
- Pre-Painted Factory Finishes: Factory-matched coatings use OEM paint codes (like Vivid Black, Amber Whiskey, or Billiard Blue). They receive multiple stages of color and durable urethane clear coats to match your tank and fenders right out of the box.
- Raw Unpainted ABS: If you plan to build a custom colorway, starting with raw ABS saves money upfront. Raw shells require block-sanding, primer, base color matching, and UV-stable clear coating to handle the road debris kicked up by the front tire.
Maximizing Touring Utility: Storage, Lighting, and Premium Audio Integration
Beyond wind deflection, lower fairings add practical storage and accessory mounting space. Standard fairing lowers feature glove boxes with snap-on covers or push-button latches, providing a weather-resistant spot for toll passes, sunglasses, and garage openers.
Visibility upgrades are another practical option. Replacing the solid front outer cap with Dynamic Lower Fairing LED Lights turns your lowers into auxiliary running lights and turn indicators. Positioning bright LED panels low on the crash bars increases your lighting footprint to help on-coming traffic spot you sooner.
Upgrading Audio with Harley Touring Lower Fairing Speaker Pods
Lower fairings provide an ideal mounting location for high-performance audio upgrades. While standard handlebar fairing speakers push sound straight back, lower fairing speaker pods angle drivers directly upward toward your helmet. This on-axis alignment cuts through wind noise at 75 mph without requiring excessive equalization.
To bring clean, powerful sound to your lower fairings, we engineer specialized audio kits built specifically for the open highway:
- Complete Speaker Systems: The Velocity Overdrive 6.5 Inch Lower Fairing Speaker Kit with Horns pairs high-output midrange drivers with compression horn tweeters to cut cleanly through exhaust rumble and road noise.
- Protective Sound Hardware: Upgrading your fairing lowers calls for rugged Velocity Overdrive Lower Fairing Tour Pack Speaker Grills that let high-frequency output pass through freely while protecting speaker cones from kicked-up road gravel.
- Depth & Magnet Clearance: High-performance speakers feature large magnet assemblies that can bottom out against the fairing wall. Using a Harley Lower Fairing 1/2 Speaker Spacer gives you the clearance needed to install heavy-duty audio gear into standard lower fairing pods.
Clean Wiring and Plug-and-Play Power Management
Routing wiring to lower fairings requires clean, water-tight harnesses that resist vibration. Running wires haphazardly along the outside of the engine guard looks messy and exposes lines to weather damage.
We recommend using an application-specific Lower Fairing T-Harness to tie your lower fairing audio cleanly into your primary harness. These harnesses route through the fairing clamp channels, using sealed, waterproof quick-disconnect plugs so you can easily remove the fairings for bike maintenance or oil filter access without cutting wires.
Step-by-Step Installation and Clearance Checks
Installing a lower fairing kit is a direct bolt-on job that can be completed in an afternoon with standard hand tools.
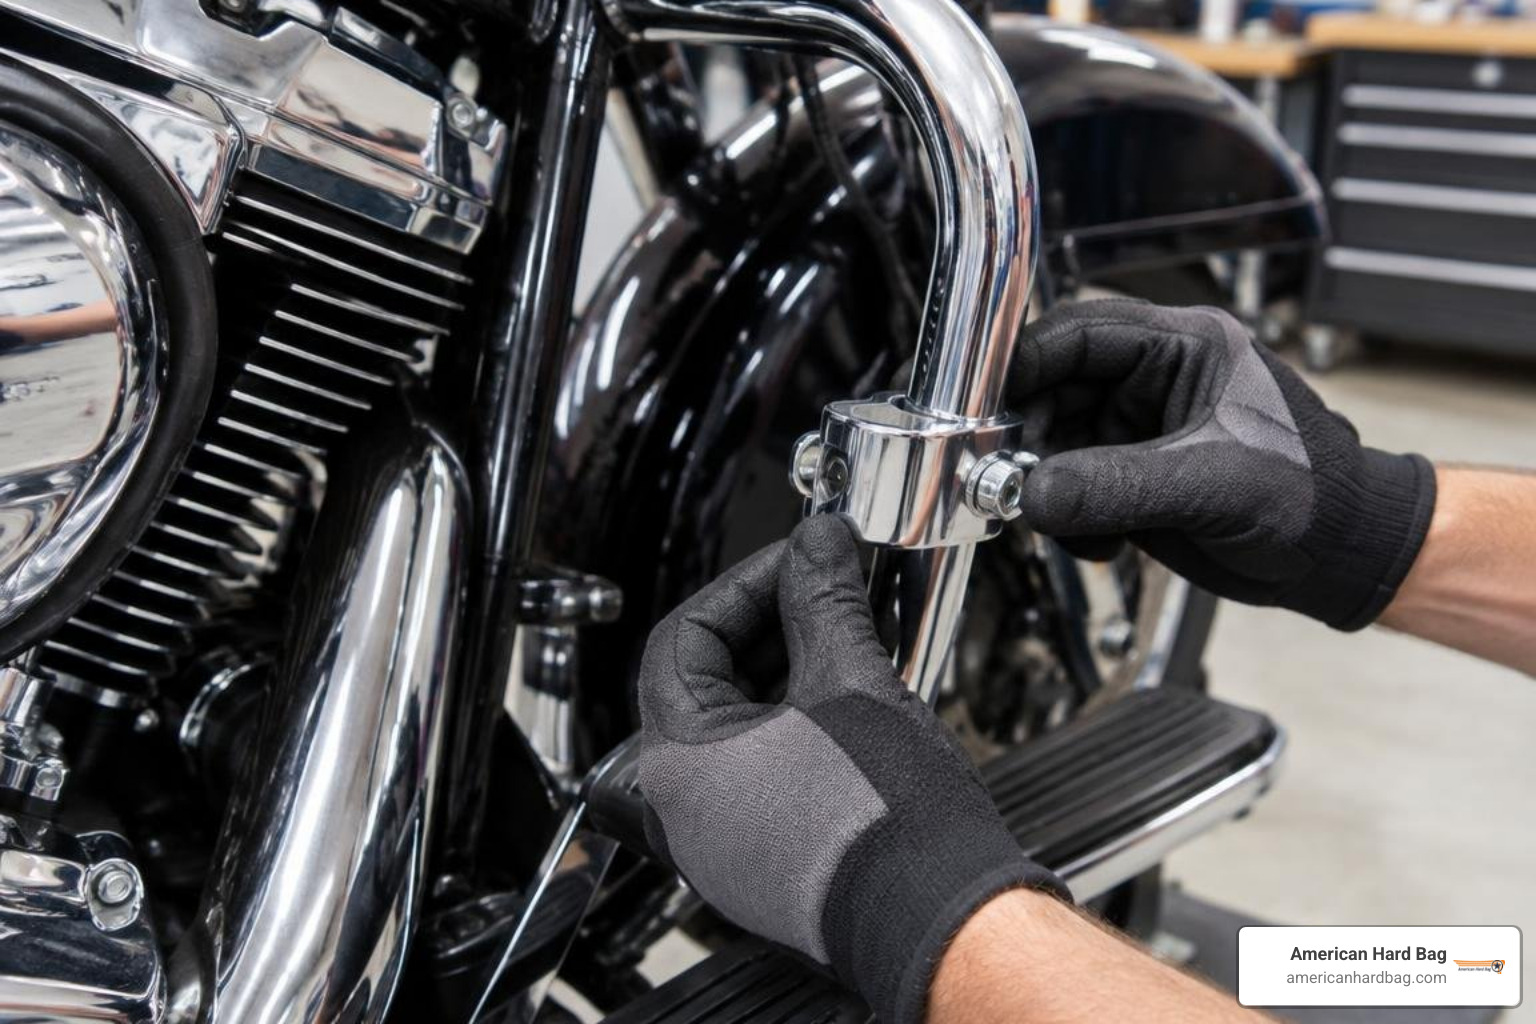
- Protect Your Finish: Wrap a layer of painter's tape around your engine guard tubes where the mounting clamps will sit to prevent scratches during test fitting.
- Mount the Upper Clamps: Position the upper fairing clamp bracket around the vertical leg of the engine guard. Thread the hardware loosely so the fairing can slide slightly for alignment.
- Position the Outer and Inner Shells: Slide the inner fairing shell into place behind the crash bar and align it with the outer shell. Secure the upper and lower attachment points using the included stainless fasteners.
- Torque the Hardware Evenly: Once the inner and outer shells are aligned, tighten the mounting bracket bolts evenly. Avoid overtightening, which can distort or crack the ABS mounting tabs.
- Install Internal Trays or Speaker Pods: Secure your storage glove box trays or speaker pods into the inner fairing cavity using the factory mounting screws.
- Check Foot Control Clearances: Sit on the bike and work the rear brake pedal through its full range of motion. Shift through all gears to make sure your shift levers, linkages, and boot toes never touch the fairing shell. Check that your floorboard mounting positions leave ample room for safe foot operation.
- Verify Front Suspension Travel: Turn the handlebars lock-to-lock. Verify that the front fender, wiring harnesses, and clutch cable clear the fairing upper edges at both extremes.
Frequently Asked Questions About Lower Fairings
Will lower fairings cause my Harley engine to overheat in hot summer traffic?
No, as long as you use vented models properly. When you open the vent sliders, air flows across the cylinder heads and down through the lower engine cases. Modern Milwaukee-Eight and Twin Cam air-cooled engines manage airflow efficiently while moving at highway speeds. In stop-and-go summer traffic, keeping the vents fully open lets heat escape normally.
Can I install standard lower fairings on a bike with a chopped engine guard?
Standard lower fairings are designed around the proportions of a full-size 1.25-inch factory engine guard. A chopped guard does not provide the height or mounting points needed to clamp the shell securely. To install lower fairings, you will need to replace the chopped bar with a standard factory-height engine guard.
What is required to add 6.5-inch speakers to touring fairing lowers?
You need a set of 6.5-inch lower fairing speaker adapter pods, rigid mounting hardware, and enough internal depth for the speaker magnets. High-power marine or motorcycle speakers typically feature larger motor structures, so you may need a spacer ring to prevent the magnet from contacting the crash bar. Using quick-disconnect wiring harnesses also keeps routine servicing straightforward.
Conclusion
Adding lower fairings to your Harley Touring motorcycle transforms your riding experience. By cutting down wind buffeting, deflecting road grime, and giving you climate-adaptive airflow control, lowers help you stay relaxed and ride longer with less fatigue.
When you are ready to pair wind protection with concert-level sound, explore our complete selection of Lower Fairing Speakers. At American Hard Bag, we design and engineer motorcycle audio upgrades that drop straight into your touring setup—delivering clear, high-output performance that handles every highway mile.