

Understanding Different Types of Speaker Adapters
Compatible speaker adapters are the mechanical brackets, wiring harnesses, and signal converters that let aftermarket speaker drivers fit and function in OEM vehicle locations. Mounting adapters match factory cutouts and bolt patterns, harness adapters preserve plug-and-play wiring and polarity, and signal adapters convert speaker-level audio when an amplifier or powered subwoofer needs a lower-level input.
Upgrading vehicle audio sounds simple until you unbox your new drivers and discover the mounting holes do not line up with the factory chassis. Standard aftermarket speakers use symmetrical circular or oval frames, whereas vehicle manufacturers design non-standard plastic housings, integrated brackets, and odd cutouts to streamline assembly line production. Bridging this mechanical and electrical gap requires the right adapter hardware.
Vehicle-Specific Speaker Adapters and Sizing Upgrades
Mechanical speaker mounting adapters allow you to secure standardized aftermarket drivers into unique factory cutouts without drilling into sheet metal or cutting fairings. They also serve as the primary tool for upsizing your sound system.
Factory vehicle openings vary widely. Touring motorcycles and compact automotive dashboards often come restricted to factory 5.25-inch locations, which lack the cone surface area needed to produce rich midbass at highway speeds. Using a 5.25 to 6.5 fairing speaker adapter lets you step up to full-sized 6.5-inch drivers in early Batwing fairings, yielding substantial improvements in volume output and vocal clarity.
Similar sizing mismatches occur in rear saddlebag lids and automotive door panels. Many touring lids come equipped with restrictive 5x7 cutouts. High-output riders frequently rely on Harley 5x7 to 6x9 speaker adapters for saddlebag lids 98-13 or a dedicated 5x7 to 6x9 speaker adapter kit for lids 2014 to mount larger 6x9 drivers directly beneath factory grills. For modern baggers, riders can also utilize the Harley 6x9 to 8" speaker adapter kit for lids 2014-2023 copy to maximize rear-stage cone area.
Downsizing or specialized driver adaptation is just as practical. In applications where an oval factory cutout compromises the sound quality of high-end component sets, installing a 6x9 to 65 inch speaker adapter allows you to run high-fidelity round drivers inside factory 6x9 enclosures. When targeting extreme pro-audio volume, a 6x9 bullet horn adapter lets you mount heavy-duty compression drivers and horn tweeters right where stock oval speakers used to live.
Across the wider 12-volt audio sector, standard adapter plates adapt 6x9 factory openings to accept 6.5-inch round speakers. Specialized bracket sets provide direct mounting solutions for vehicle dashes and door panels without sheet metal modification. Whether adapting import enclosures or domestic housings, precision mounting plates eliminate the need for irreversible vehicle modifications.
Wiring Harnesses and Signal Level Adapters
Mechanical fitment is only half the battle; electrical integration is equally important. Factory speaker wiring connects to stock drivers using proprietary plastic snap-connectors. Cutting these plugs off destroys the factory harness, drops resale value, and introduces potential solder corrosion down the road.
Speaker wiring harness adapters feature vehicle-specific quick-connect terminals on one end and standard spade connectors on the other. They deliver a clean, solderless replacement that preserves correct acoustic polarity (positive to positive and negative to negative), preventing phase cancellation issues where opposing speaker movements neutralize your bass output.
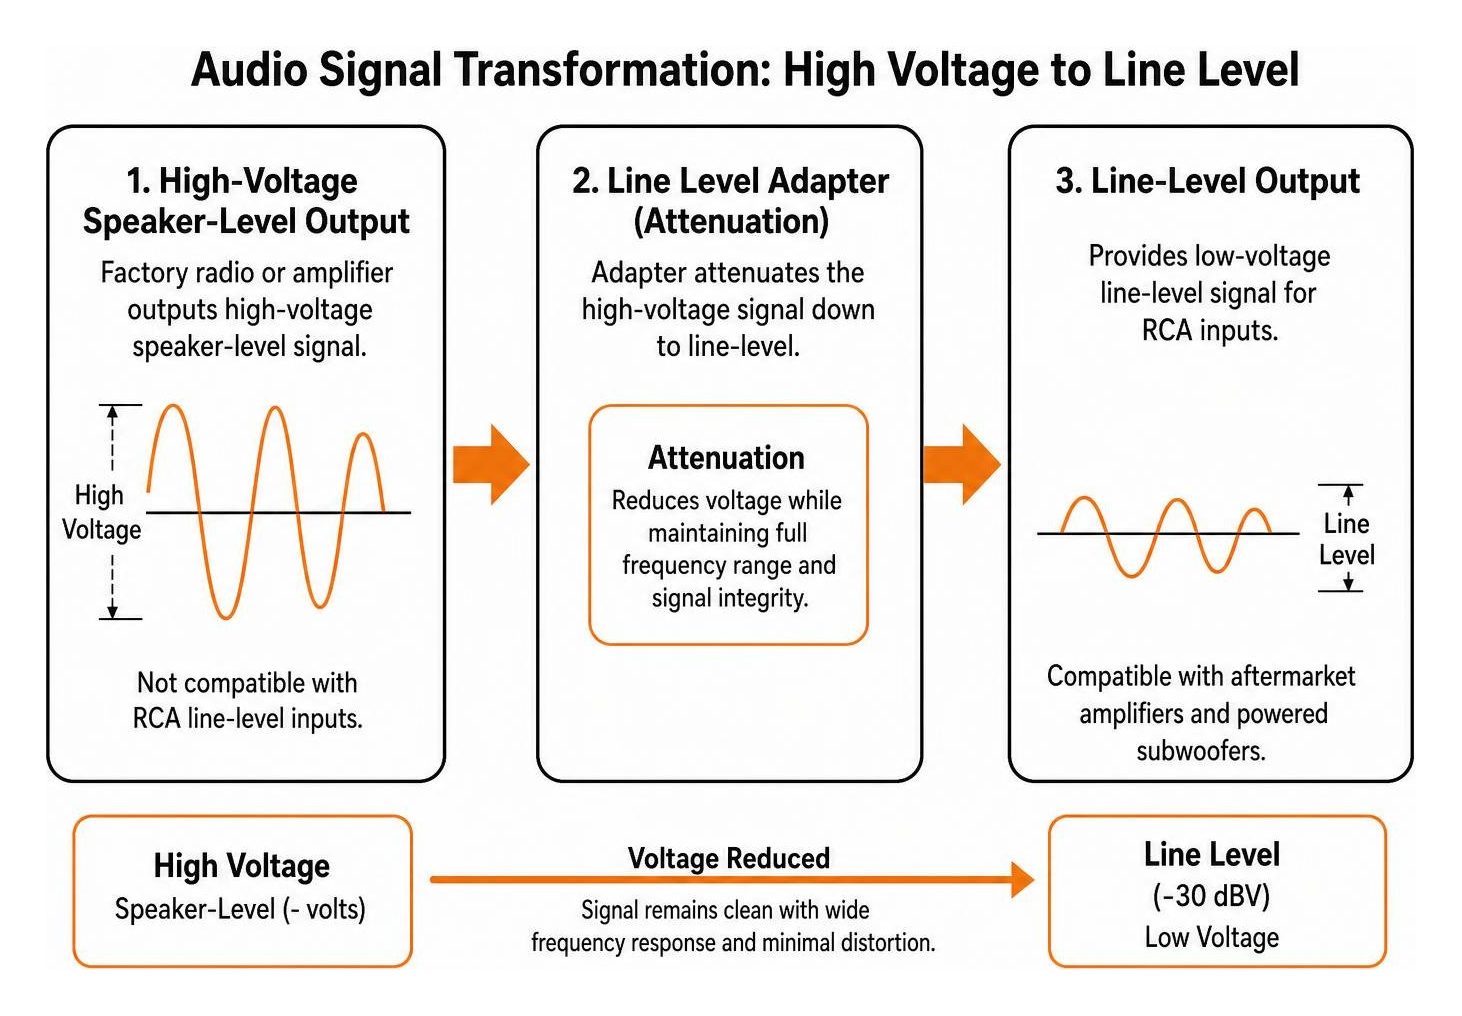
Beyond simple plug adapters, specialized audio conversions require signal-level interface adapters:
- Line Output Converters (Speaker-Level to Line-Level Adapters): Factory radios and baseline amplifiers output high-voltage speaker-level signals. Aftermarket amplifiers and powered subwoofers require low-voltage RCA inputs. A line level adapter attenuates high-voltage speaker leads down to a safe line-level signal (-30 dBV) with wide frequency response and minimal harmonic distortion.
- Microcontroller & Embedded Audio Modules: For custom DIY displays and compact maker builds, small embedded audio boards with onboard Class D amplification and plug-and-play pinouts can bypass noisy analog headphone jacks entirely.
Material Construction and Acoustic Performance
The structural integrity of your adapter bracket directly dictates the acoustic performance of your speaker. When a speaker cone pushes outward to generate sound pressure, the speaker frame pushes backward with equal force. If the adapter plate flexes under this counter-force, acoustic energy dissipates as mechanical vibration rather than radiating into the air as clean sound.
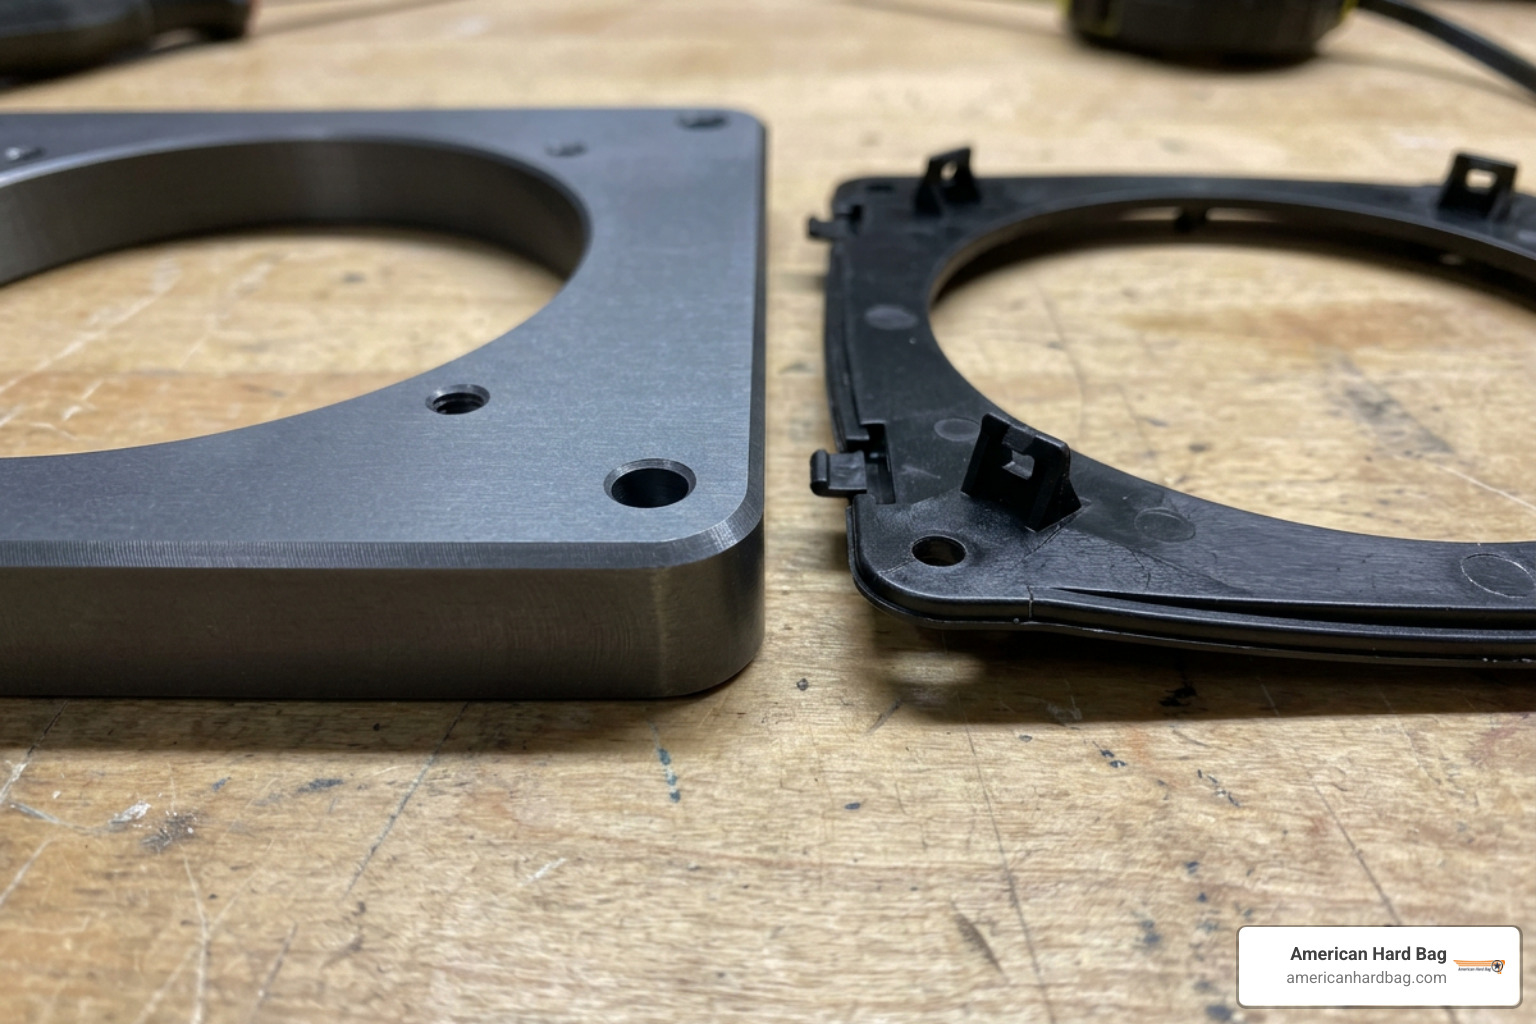
Rigid HDPE vs. Standard ABS Plastics
Most entry-level automotive brackets use injection-molded ABS plastic. While ABS is inexpensive and easily shaped into thin profiles with breakaway tabs, thin plastic brackets tend to flex, twist, and resonate when driven by high-output amplifiers.
For high-power audio systems, heavy-duty CNC-machined High-Density Polyethylene (HDPE) provides superior performance. High-end custom applications—such as 1-inch thick solid HDPE adapters—demonstrate the value of rigid materials across demanding audio builds.
Solid HDPE provides three critical physical advantages:
- Mass and Structural Damping: Dense HDPE absorbs mechanical vibrations, preventing unwanted bracket resonance from coloring vocal and midbass frequencies.
- No Baffle Flex: The rigid surface keeps the speaker basket anchored in place, ensuring maximum forward energy transfer from the driver's cone.
- Added Mounting Depth: A solid 1-inch or 1/2-inch adapter spaces the speaker frame outward, clearing deep magnets away from rear obstacles like internal window glass or saddlebag latch mechanisms.
Acoustic Sealing and Gasket Integration
Even the most rigid adapter will fail acoustically if air leaks around the mounting perimeter. High fidelity depends on isolating the front soundwave of the speaker cone from the rear soundwave. If air leaks through gaps between the adapter and the mounting baffle, these opposing waves collide and cancel each other out, robbing the system of bass.
| Adapter Material | Structural Rigidity | Resonance Damping | Weather & Moisture Resistance | Depth Spacing Capability |
|---|---|---|---|---|
| Thin Molded ABS | Moderate | Low (flexes under power) | High | Minimal (1/8" to 1/4") |
| Solid CNC HDPE | Maximum | Maximum (high mass absorption) | Extreme (will not rot or absorb water) | Substantial (1/2" to 1" solid spacer) |
| Treated MDF/Wood | High | High | Very Poor (swells and rots in wet environments) | Variable |
| Billet Aluminum | Extreme | Moderate (can ring without damping) | High | Moderate (requires precise machining) |
To prevent acoustic cancellation, always apply closed-cell foam gasket tape or silicone baffling between the vehicle chassis, the adapter plate, and the speaker basket rim. This creates an airtight seal that eliminates rattles and delivers tight, punchy midbass.
Step-by-Step Installation and Vehicle Compatibility Guide
Installing aftermarket speakers using vehicle-specific adapters is a straightforward DIY project when planned properly.
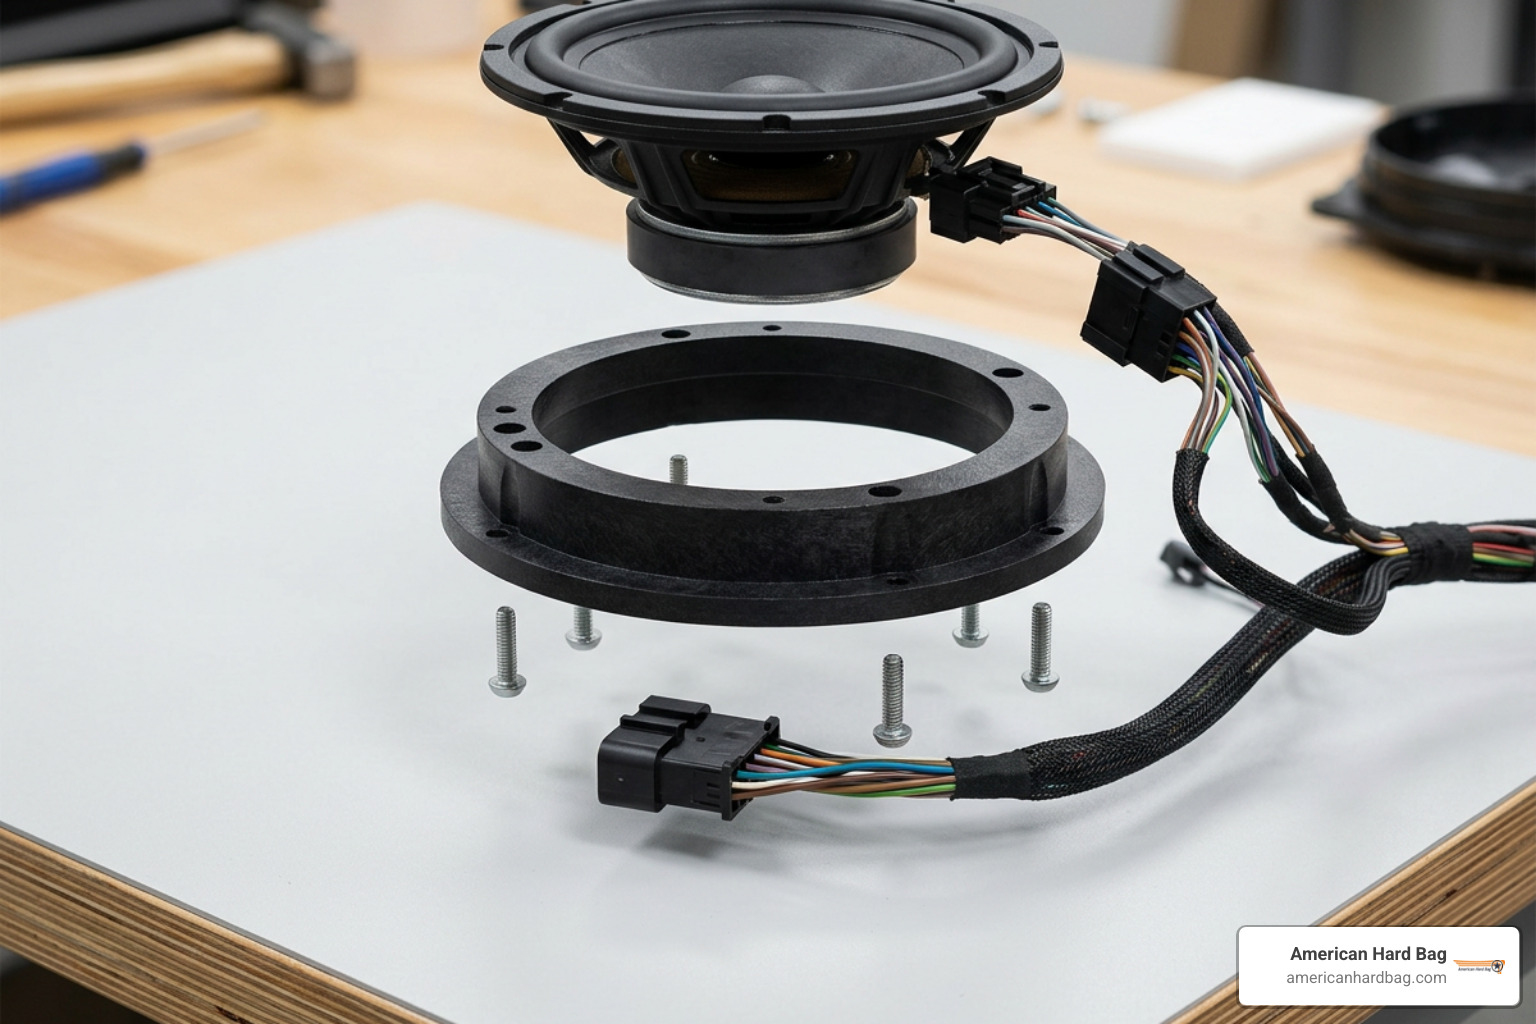
Step-by-Step Installation Process
- Remove the Outer Panel or Fairing: Carefully remove outer door cards or motorcycle fairing shells using non-marring pry tools to access the factory speaker pods.
- Unbolt and Disconnect the OEM Driver: Remove the factory retaining screws and disconnect the vehicle's proprietary wiring plug.
- Prep the Mounting Surface: Clean dust and road grime from the perimeter of the factory cutout.
- Install the Adapter Plate: Align the adapter bracket with the factory screw holes. Fasten it down securely using stainless steel hardware to prevent corrosion.
- Apply Foam Gasketing: Line the adapter's speaker mounting surface with closed-cell gasket foam to form an airtight seal.
- Connect the Wiring Harness Adapter: Clip the plug-and-play wiring harness into the factory audio lead, and push the female spade terminals onto the matching positive and negative terminals of the new speaker.
- Mount the Speaker: Center the driver over the adapter ring and drive the mounting screws in an alternating criss-cross pattern to ensure uniform clamping pressure across the basket.
- Test and Reassemble: Power on the sound system to check balance, fader, and polarity before reinstalling your grilles and exterior body panels.
For detailed walkthroughs on specific motorcycle projects, follow our comprehensive 1998-2013 5x7 to 6x9 adapter installation guide or our step-by-step 2014 Harley 5x7 to 6x9 lid adapter kit instructions.
Troubleshooting Fitment with Custom Speaker Adapters
If your aftermarket driver does not seat cleanly into the mounting location, common physical clearance issues are easy to resolve:
- Magnet Depth Clearance: High-power drivers use oversized motor structures that may contact internal window glass or bag interiors. Adding a pair 1/2 6x9 spacer for Harley shifts the speaker basket outward, giving deep magnets the clearance they need.
- Pro-Audio Tweeter Protrusions: Compression horn tweeters project further forward than standard dome tweeters. Upgrading to specialized 98-13 Street Glide horn grills with 6.5 speaker adapters accommodates high-output horn packages while protecting the driver from road debris.
- Universal Tab Interference: Multi-fit adapter plates include breakaway tabs for broad vehicle compatibility. If a tab conflicts with your vehicle's sheet metal cutout, clip it off using heavy-duty wire cutters.
Frequently Asked Questions About Speaker Adapters
Can I install a larger speaker than the factory size using an adapter?
Yes. Sizing up is one of the most popular reasons to use an adapter bracket. Precision adapter rings expand small factory 5.25-inch fairing cutouts to accept 6.5-inch drivers, and convert restrictive 5x7 saddlebag lids to high-output 6x9 baffles. Always confirm top-mount magnet depth and grille clearance before ordering to ensure the larger speaker will fit inside your outer enclosure.
What is the difference between a mounting adapter and a wiring harness adapter?
A speaker mounting adapter is a rigid physical bracket (made of HDPE, ABS, or aluminum) that bridges the shape and bolt-hole spacing of your vehicle chassis to match the mounting frame of an aftermarket speaker. A wiring harness adapter is an electrical lead that plugs directly between the factory vehicle wiring harness and the new speaker terminals, eliminating wire cutting while preserving correct electrical polarity.
How do I determine which speaker adapter fits my vehicle?
Identify your vehicle's exact make, model, trim, and production year. Next, verify whether your vehicle came equipped with a base factory radio or a premium amplified sound system, as premium packages often utilize different speaker housings and wiring connectors. Finally, cross-reference your new speaker's cutout diameter and top-mount depth against the adapter's inner diameter specifications.
Conclusion
Upgrading your audio system delivers clean, dynamic sound on the open road, but high-end speakers can only perform as well as their mounting foundation. Choosing precision-machined, rigid speaker adapters ensures seamless mechanical fitment, eliminates acoustic flex, preserves your factory wiring, and maximizes overall output.
Ready to build a high-power audio system tailored specifically for the open highway? Check out our complete ultimate guide to upgrading your Harley-Davidson audio system for expert component recommendations, wiring strategies, and custom installation guides from our team in Rocklin, California.