

Why Every Road King Rider Eventually Searches for a Better Sound System
Choosing the right stereo for Road King motorcycles is one of the most common upgrades riders make — and one of the most confusing. Unlike the Street Glide or Road Glide, the Road King has no factory fairing speakers. That means you start from scratch, and the options can feel overwhelming fast.
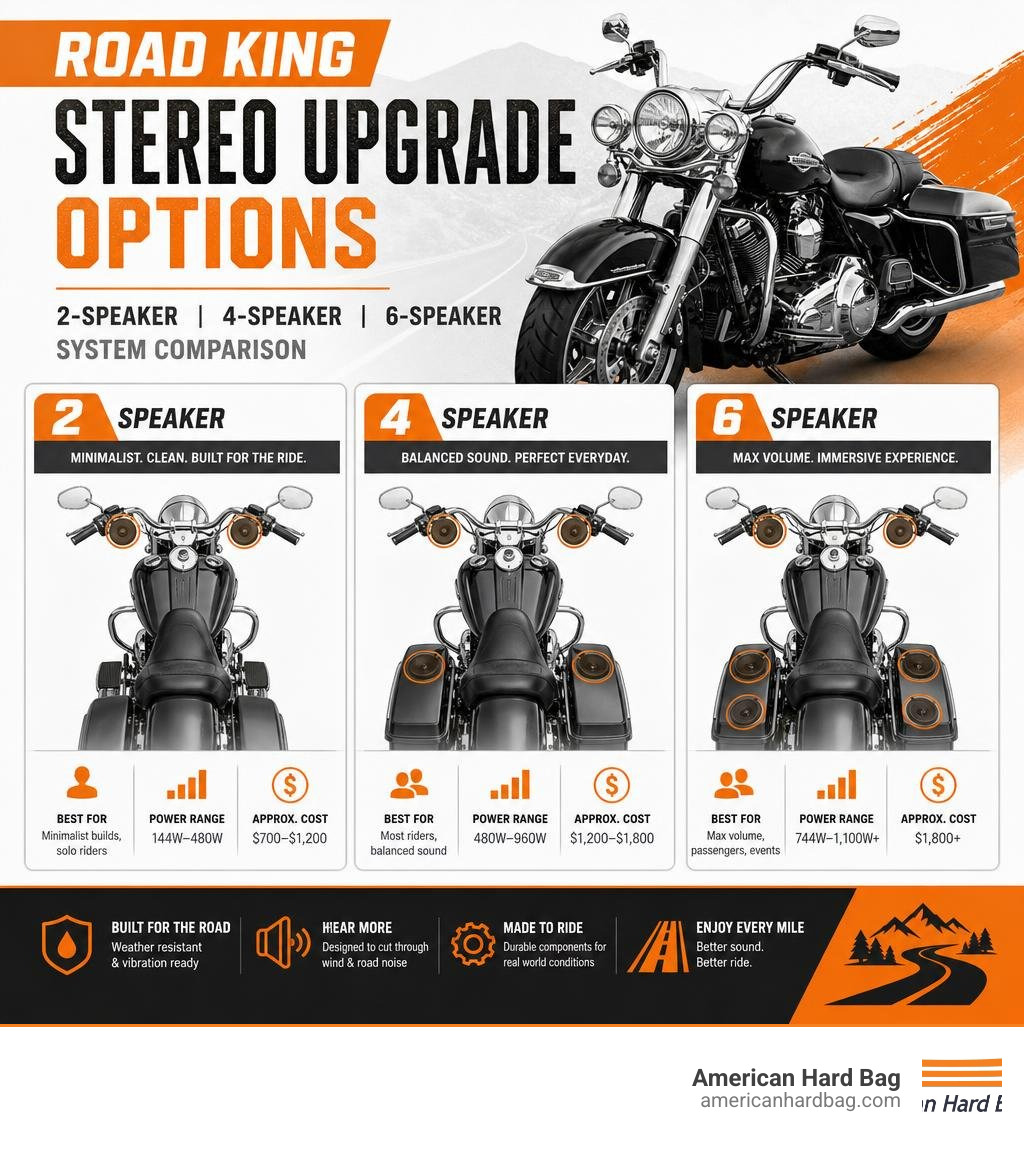
Here are the most popular Road King stereo upgrade options at a glance:
| System Type | Best For | Power Range | Approx. Cost |
|---|---|---|---|
| 2-Speaker (handlebar or highway bar) | Minimalist build, solo riders | 144W–480W | $700–$1,200 |
| 4-Speaker (bars + saddlebag lids) | Most riders, balanced sound | 480W–960W | $1,200–$1,800 |
| 6-Speaker Surround | Max volume, passengers, events | 744W–1,100W+ | $1,800+ |
The core challenge is simple: wind, exhaust noise, and vibration eat your music alive at highway speeds. A system that sounds great in the parking lot can disappear at 70 mph. Getting it right means choosing the correct speaker placement, enough amplifier power, and components built to handle real riding conditions — rain, heat, and constant vibration included.
Forum riders report spending anywhere from $700 to over $1,800 on full Road King audio upgrades, depending on speaker count, amplifier size, and whether they go the DIY or professional installation route.
This guide cuts through the noise. You'll find clear comparisons of leading systems, honest pros and cons for each speaker placement option, and everything you need to make a confident decision.
At American Hard Bag, we're a US-based manufacturer of premium motorcycle accessories with deep expertise in Road King audio upgrades — from full stereo for Road King kit recommendations to the hard bags that house your amplifiers. Our experience building road-ready components means we understand what actually works when the pavement gets loud.
Choosing the Best Stereo for Road King Upgrades
Upgrading the audio on a Road King requires a completely different strategy than other Harley-Davidson touring models. Because there is no massive plastic fairing to hide a traditional double-DIN head unit, we have to get creative with how we control and source our music.

When designing a stereo for Road King setups, the "stereo" itself usually refers to the source unit. On a Road King, this is almost always a compact, handlebar-mounted Bluetooth controller, a hidden receiver inside the saddlebag, or a specialized gauge-pod replacement that integrates directly into your nacelle.
Modern smartphone integration is the gold standard here. You want a system that pairs instantly with your phone when you turn the key, allowing you to stream music from Spotify, Apple Music, or your personal library. Since your phone is doing the heavy lifting, the physical source unit simply needs to handle volume, track selection, and play/pause commands via easy-to-use, glove-friendly physical buttons. To understand how these layouts fit into the broader landscape of Harley audio, check out our guide on Understanding Harley-Davidson audio setups.
Key Features of a High-Performance Stereo for Road King
A motorcycle is a brutal environment for electronics. If you use standard marine gear or cheap car audio components, they will fail. When shopping for a Road King audio system, look for these non-negotiable features:
- IPX6 Weatherproofing: Your components must be able to withstand direct downpours, high-pressure washes, and road spray.
- Element Ready Design: Look for UV-resistant plastics that won't fade or crack under constant California sun, as well as gold-plated or sealed electrical connectors that resist corrosion.
- Vibration Damping: Motorcycles shake — especially big air-cooled V-twins. Amplifiers and speaker mounts must feature robust brackets and internal potting to keep delicate solder joints from cracking.
- High Efficiency (Class-D): Your Road King’s charging system has limited stator output. High-efficiency Class-D amplifiers deliver massive wattage without draining your battery or running hot in enclosed saddlebags.
Aftermarket vs. Factory Audio Options
When planning your upgrade, you have two primary paths: official Harley-Davidson parts or high-performance aftermarket systems.
The Official Harley-Davidson Audio Equipment catalog features systems powered by Rockford Fosgate. These are well-engineered, offer clean integration, and are covered by factory warranties. However, they are often power-limited to protect factory electrical systems and can carry a premium price tag for the output they deliver.
Aftermarket systems, on the other hand, offer incredible value and raw performance. For example, a high-quality aftermarket setup can deliver two to three times the RMS wattage of a factory-branded system for the same price. This extra power is what gives you "headroom" — the ability to play music loudly without distortion, which is absolutely essential when trying to overcome highway wind noise.
Speaker Configurations: 2-Speaker, 4-Speaker, and 6-Speaker Setups
How many speakers do you actually need on a Road King? The answer depends entirely on how fast you ride, whether you use a windshield, and if you carry a passenger.
| Configuration | Typical Speaker Locations | Pros | Cons |
|---|---|---|---|
| 2-Speaker | Handlebars OR Highway Bars OR Saddlebag Lids | Clean look, retains all bag space, budget-friendly | Limited surround effect, struggles at 80+ mph without a windshield |
| 4-Speaker | Handlebars/Highway Bars + Saddlebag Lids | Excellent balance, wraps the rider in sound, clear at high speeds | Requires running wires to the rear, slightly reduces bag space |
| 6-Speaker | Handlebars + Highway Bars + Saddlebag Lids | Concert-level volume, perfect for passengers, maximum bass | Expensive, complex wiring, requires high-output multi-channel amp |
Pros and Cons of Different Speaker Locations
Where you put the speakers on a Road King matters just as much as how much power you feed them. Let’s break down the four primary mounting locations:
1. Handlebar Speakers (3.5" to 4" Pods)
- Pros: Positioned high up and aimed directly at your ears. Excellent clarity at low to moderate speeds.
- Cons: Small speaker size limits bass response; can look cluttered on clean, custom handlebars.
2. Highway Bar / Engine Guard Pods (6.5" Speakers)
- Pros: Allows for larger 6.5" mid-bass drivers. Tucked down out of your direct line of sight. Excellent projection toward the rider's chest.
- Cons: Can be blocked by your legs or highway pegs; susceptible to road debris and water kicked up by the front tire.
3. Lower Fairing Speakers (6.5" Speakers)
- Pros: Clean, integrated look if you run soft or hard lowers. Excellent acoustic enclosure volume for rich mid-bass.
- Cons: Requires the purchase of lower fairings; adds bulk to the front of the bike.
4. Saddlebag Lid Speakers (6x9" or 6.5" Speakers)
- Pros: Delivers massive volume and deep bass. Fills out the rear soundstage so you feel completely surrounded by your music.
- Cons: Points straight up into the air, meaning some sound projects away from you at high speeds; requires cutting your factory lids or buying aftermarket lids.
For a deeper dive into choosing the right size and style for your bike, read our guide on Harley audio speaker selection.
Maximizing Volume and Clarity at Highway Speeds
Have you ever turned up a cheap stereo on the highway only to hear a screeching, painful mess? That is distortion, and it happens when your speakers run out of physical movement (excursion) or your amplifier runs out of clean power.
To get clean, wind-defying sound at 75 mph, you must focus on midrange and high-frequency projection. High frequencies (tweeters) are highly directional. If your tweeters aren't aimed at your chest or helmet, the wind will sweep the sound away before it reaches your ears.
Furthermore, you need to choose speakers designed specifically for open-air environments. Standard car speakers rely on the sealed cabin of a vehicle to create bass and control speaker cone movement. Motorcycle-specific speakers, like those detailed in our guide on Choosing the right speakers for a Harley-Davidson, feature stiffer suspensions and weather-resistant cones engineered to project sound across open asphalt.
Amplifiers and Wiring: Powering Your Road King Audio
No matter how good your speakers are, they are only as good as the signal they receive. A high-quality amplifier is the beating heart of any stereo for Road King upgrade.

Because a Road King has no fairing to hide an amplifier, we typically mount the amp inside one of the saddlebags. We use specialized, laser-cut mounting brackets that bolt directly to the interior organizer mounts of your bags, keeping the amplifier secure, elevated, and out of the way of your luggage.
When choosing an amplifier, look for a compact Class-D design. Class-D amplifiers convert over 90% of their electrical draw into clean sound power, whereas older Class-A/B amps waste up to 50% of their power as heat. Keeping heat low is critical when your amplifier is living inside a sealed ABS plastic saddlebag. For a complete breakdown of power ratings and channel configurations, read our guide on How to choose the right amplifier for your Harley.
Designing a Custom Stereo for Road King System
Wiring a motorcycle can be intimidating, but modern plug-and-play engineering has changed the game. Gone are the days of stripping, soldering, and electrical-taping your bike's main harness.
At American Hard Bag, we always recommend using a model-specific T-harness. This harness plugs directly in-line with your factory wiring, allowing you to tap into power, ground, and ignition signals safely without voiding your Harley-Davidson warranty.
When routing power from your battery to the saddlebag-mounted amplifier, always use high-spec, 100% pure oxygen-free copper (OFC) wire. Cheap copper-clad aluminum (CCA) wire resists electrical flow, runs hot, and can corrode quickly when exposed to moisture. Ensure your power runs are protected by an appropriate inline fuse (typically 60 amps for an 800W system) located within 18 inches of the battery terminal. For step-by-step wiring diagrams, reference our Harley speaker wiring guide.
Frequently Asked Questions about Road King Audio Upgrades
What is the typical cost of a complete Road King audio system upgrade?
The cost of upgrading your Road King's audio system depends heavily on how loud you want to go:
- Entry-Level ($700 - $1,100): Typically includes a 2-speaker handlebar or highway bar pod setup with a compact amplifier and Bluetooth controller. Great for around-town cruising and moderate highway speeds.
- Mid-Tier ($1,200 - $1,800): A solid 4-speaker system (front pods + saddlebag lids) powered by a 400W to 800W amplifier. This is the sweet spot for most riders, offering great highway clarity.
- Premium ($1,800 - $3,500+): High-end setups featuring American-engineered plug-and-play packages, 4 to 6 premium speakers with Neodymium magnets, high-output Class-D amplifiers, custom painted lids, and professional-grade wiring.
Are aftermarket motorcycle audio systems fully weatherproof?
Yes, provided you choose components labeled as marine-grade or Element Ready. High-quality motorcycle audio gear features conformal-coated circuit boards (a silicone layer that protects internal electronics from moisture), UV-treated speaker cones, and waterproof quick-disconnect wiring plugs. While you shouldn't submerge your bike in a lake, a properly designed system will easily survive heavy rainstorms and routine cleanings.
Is professional installation recommended for Road King stereo kits?
If you enjoy working on your own bike and have basic hand tools, many modern kits are designed for DIY installation. Premium kits include pre-wired harnesses, color-coded connectors, and detailed templates for cutting your saddlebag lids.
However, if you are uncomfortable removing your gas tank to route power wires, or if you want absolute perfection when tuning your amplifier's gain settings, professional installation is a smart investment. A professional shop can also use an oscilloscope to set your amplifier gains, ensuring your system plays at maximum volume with zero speaker-damaging distortion.
Conclusion
Upgrading the stereo for Road King motorcycles doesn't mean you have to compromise the classic, stripped-down look of your bike. By choosing the right combination of high-efficiency Class-D amplifiers, weatherproof handlebar or saddlebag speakers, and a clean Bluetooth source unit, you can enjoy concert-quality sound that cuts straight through the wind at 80 mph.
Ready to build your dream setup? Explore our complete, step-by-step walkthrough in The Ultimate Guide to Upgrading Your Harley Davidsons Audio System to find the perfect gear for your next ride.