

Key Factors When Choosing a 4 Channel Motorcycle Amplifier
For a touring motorcycle, the best 4-channel motorcycle amplifier choices combine 2-ohm stability, 100–250 watts RMS per channel, weather-resistant construction, and a compact fairing-ready footprint. Top options include high-performance designs like the Velocity RZA1000.4. Choosing an amplifier for a touring motorcycle is completely different from picking one for a car. In a car, you are sitting inside an insulated cabin with a closed acoustic environment. On a motorcycle running at 75 mph down the interstate, you are battling wind turbulence, mechanical engine noise, and aftermarket exhaust pipes. To cut through all that roar, your audio gear needs to deliver continuous, distortion-free power while surviving harsh road conditions.
Before pulling the trigger on any unit, you need to understand how to choose the right amplifier for your sound system. A successful audio build comes down to four fundamental criteria:
- Continuous RMS Wattage Rating: Always ignore marketing labels boasting thousands of "peak" or "max" watts. Peak wattage is an unregulated measurement that represents momentary bursts of power right before failure. What matters for cruising speeds is continuous RMS (Root Mean Square) power. You want an amplifier capable of delivering at least 100 to 250 watts RMS per channel cleanly without entering thermal shutdown or clipping the audio signal.
- Impedance Compatibility (Ohms): Many factory and aftermarket Harley-Davidson touring speakers are engineered around 2-ohm or 4-ohm loads. If your amplifier is only rated stable at 4 ohms and you connect 2-ohm speakers in parallel, the amp will draw excessive current, overheat rapidly, and likely blow an internal channel. Always match the amplifier’s rated stability at specific ohm loads to the final impedance configuration of your speakers.
- Physical Fairing Clearance and Weight: Fairing cavities—especially on modern Road Glide and Street Glide models—are packed tight with factory gauges, infotainment units, bracketry, and wiring bundles. A great amplifier must feature a compact footprint engineered specifically to tuck inside the fairing without pinching wiring looms or obstructing the handlebar sweep.
- Weather and Vibration Resistance: A motorcycle lives in an open-air environment. Amplifiers mounted inside a front fairing or rear saddlebag are subjected to extreme road vibrations, sudden temperature shifts, engine heat, and moisture from heavy downpours. High-tier motorcycle amplifiers feature conformal-coated circuit boards that seal sensitive electrical traces against moisture, corrosion, and dirt intrusion.
- FM Radio Reception Shielding: Class D digital amplifiers frequently emit heavy electromagnetic interference (EMI) that wipes out local FM radio reception when mounted directly under the fairing near factory antennas and radio head units. Premium, purpose-built motorcycle amplifiers utilize specialized internal filtering and shielded aluminum heatsinks to keep your radio tuner functional.
| Amplifier Model | RMS Power Output (Per Channel) | Total Channels | Impedance Stability | Weather Resistance |
|---|---|---|---|---|
| Velocity RZA1000.4 | 250W RMS x 4 @ 2Ω / 150W RMS x 4 @ 4Ω | 4 | 2-Ohm / 4-Ohm Stable | Conformal-Coated Marine Grade |
High-Output 4-Channel Amplifiers Tested on the Highway
Motorcycle amplifiers operate under brutal conditions. Because a motorcycle’s charging system produces a finite amount of electrical current, modern motorcycle audio relies almost exclusively on advanced Class D digital topology. Modern Class D designs achieve higher electrical efficiency than traditional designs, converting incoming battery current directly into acoustic power rather than wasted ambient heat.
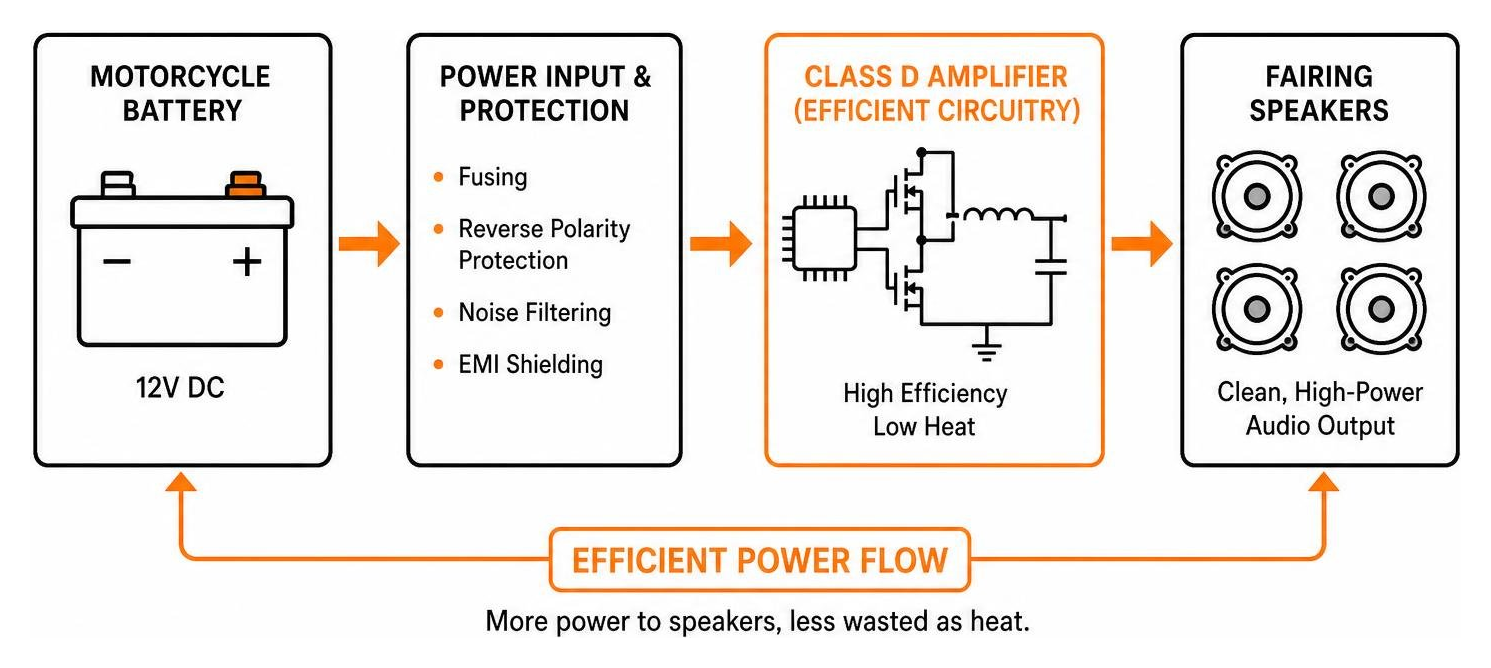
When running full throttle at highway speeds, continuous power output translates directly into dynamic headroom. Headroom is the safety margin that lets your speakers play loud, sharp musical transients—like snare hits and vocal peaks—without distorting. When an amplifier runs out of power, it clips the audio waveform, turning a smooth sine wave into a harsh square wave that quickly burns out speaker voice coils.
Top-Tier 4 Channel Motorcycle Amplifier Options for Touring Bikes
If you are running a complete four-speaker setup (such as fairing upper speakers paired with lower fairing pods, or fairing speakers paired with rear saddlebag lid speakers), high-output systems represent the benchmark in modern touring audio:
Velocity RZA1000.4
When maximum sound pressure level (SPL) and clarity are required to overpower loud exhaust pipes, the Velocity RZA1000.4 high-power amplifier is engineered specifically for Harley applications. Delivering up to 1,100 total watts, it pushes an impressive 250 watts RMS per channel into a 2-ohm load (or 150 watts RMS into 4 ohms). It is built with an ultra-compact chassis designed to fit smoothly into tight fairing locations without overheating or sacrificing FM radio reception.
Fairing Installation and Wiring Best Practices
A high-end amplifier cannot perform if it is starved for electrical current or fed a dirty audio signal. Clean installation practices make the difference between an audio system that rocks reliably for years and one that constantly suffers from blown fuses, alternator whine, or thermal cutouts.
When getting ready to wire your motorcycle, follow our comprehensive step-by-step touring amplifier install guide to ensure every component is mounted securely.
Here are the essential installation principles every rider needs to follow:
- Use Dedicated Heavy-Gauge Power Cabling: Never tap into existing factory accessory circuits to power a high-output amplifier. An amp pushing hundreds of watts requires thick, oxygen-free copper (OFC) wiring routed directly to the motorcycle battery terminals. We recommend our 8 gauge fairing power harness equipped with a quick-disconnect connector, which makes removing your fairing for maintenance quick and painless.
- Integrate Rear Speaker Wiring Seamlessly: If you are running rear saddlebag speakers or tour pack pods, avoid messy loose wiring along your frame rails. Running a purpose-built saddlebag amplifier wiring harness allows you to route high-level speaker signals neatly beneath the seat and gas tank with waterproof quick-release plugs at the bags.
- Bypass Factory Amplifiers Cleanly: Many modern Harley models feature factory audio modules that introduce aggressive internal DSP equalization curves. To feed your new amp a pure, flat-frequency line-level signal without cutting up the original harness, install a factory amplifier bypass harness.
- Set Gains Using an AC Voltmeter: Never treat amplifier gain controls as volume knobs or turn them to max by ear. Improper gain settings introduce devastating harmonic distortion that destroys speaker voice coils. Always follow our guide on setting amplifier gains by voltage using a digital multimeter and standard test tones to guarantee maximum undistorted output.

Frequently Asked Questions About Motorcycle Audio Systems
Can You Wire 2-Ohm Speakers to a 4 Channel Motorcycle Amplifier?
Yes, but how you connect them depends entirely on the amplifier’s internal circuitry. If your amplifier is explicitly rated 2-ohm stable per channel (like the Velocity RZA series), you can connect one 2-ohm speaker directly to each output channel for maximum power delivery.
However, if you have an amplifier that is only stable at 4 ohms, connecting a 2-ohm speaker directly will overload the amplifier and cause it to shut down. Some riders attempt to get around this by wiring two 2-ohm speakers in series (connecting the positive terminal of speaker A to the negative terminal of speaker B).
While series wiring combines their resistance into a safe 4-ohm load, there is a significant performance penalty: it effectively halves the power delivery across the speakers, dropping usable output down to roughly 30 watts RMS per speaker. At that low wattage, you lose dynamic punch, leaving the system struggling to sound any better than factory stock equipment at speed. The far better approach is choosing an amplifier engineered natively for 2-ohm stability.
Why Is Saving for a Quality Amp Better Than Buying Budget Units?
In motorcycle audio, the old saying holds true: buy once, cry once. A budget $100 amplifier might look tempting online, but bargain-basement micro-amps cut corners on essential hardware. They often lack conformal board coatings, utilize weak power supplies, generate severe FM radio interference, and distort heavily above half volume.
Riders who go the cheap route frequently find their amplifiers overheating inside the fairing after 20 minutes of riding, or failing completely within months. Replacing a cheap amplifier two or three times quickly costs more in wasted money, replacement fuses, and labor than doing the job right the first time. A quality motorcycle amplifier features heavy thermal heat sinks, clean signal filtering, marine-grade circuit protection, and continuous power that keeps your music clear for years to come.
How Do Windshields and Exhaust Systems Impact Audio Clarity?
Your amplifier provides the raw audio power, but external motorcycle aerodynamics dictate how much of that sound actually reaches your ears.
- Exhaust Profiles: Loud, unbaffled aftermarket exhaust pipes generate continuous low-frequency drone ranging from 90 to over 105 decibels. To overcome this noise floor, your audio system must produce clean sound at an even higher decibel level without clipping.
- Windshield Deflection: A tiny or poorly shaped windshield dumps high-velocity wind turbulence directly into your helmet face shield and ears. This turbulence creates massive acoustic masking that swallows up vocal mid-range frequencies. Upgrading to a properly contoured recurve windshield deflects dirty air up and over your helmet, dramatically lowering the ambient noise floor and making your audio system sound noticeably louder and crisper at identical volume settings.
For a deeper technical breakdown of how amplifier power and speaker impedance interact, see the Audio power reference on Wikipedia.
Conclusion
Building a touring sound system that cuts through wind and highway roar requires matching the right hardware to the unique acoustic demands of your motorcycle. Installing a purpose-built 4-channel amplifier with true continuous RMS wattage, robust weatherproofing, and proper impedance compatibility ensures your music stays loud, punchy, and crystal-clear mile after mile.
When you are ready to upgrade your ride with proven, high-output power, explore the full lineup of premium motorcycle amplifiers designed for seamless Harley-Davidson installations.