

Why Upgrading Your Harley Street Glide Stereo is the Ultimate Road Upgrade
Upgrading your harley street glide stereo is the single best way to bring your riding experience to life. Stock motorcycle audio systems simply cannot compete with wind, highway speeds, and loud exhaust pipes.
If you want a quick answer on how to get the best sound on your Street Glide, here is the ideal upgrade path:
- The Head Unit: Swap your factory radio for a plug-and-play receiver featuring wireless Apple CarPlay, Android Auto, and an IPx5 or higher weather-resistance rating.
- The Speakers: Install high-efficiency 6.5-inch fairing speakers with powerful neodymium magnets designed to fit tight fairing spaces.
- The Amplifier: Add a compact Class D marine-grade amplifier (at least 300 Watts RMS) to power your speakers safely without straining your charging system.
- The Wiring: Use a vehicle-specific T-harness kit to keep the installation completely plug-and-play with no wire cutting.
Most riders find themselves incredibly frustrated by weak factory sound. When you hit 60 MPH, your favorite songs turn into a garbled mess of treble and wind noise.
Upgrading your audio is not just about making your bike louder. It is about achieving clean, undistorted sound that you can actually understand at highway speeds.
At American Hard Bag, we have spent years designing and testing premium audio solutions specifically engineered to maximize your harley street glide stereo performance. Our hands-on experience helping thousands of riders build high-output, weather-resistant bagger systems ensures you get clear sound that cuts through highway noise without the headache of custom fabrication.

Evolution of the Harley Street Glide Stereo Across Generations
To choose the perfect audio components, you must first understand the generation of your touring motorcycle. Harley-Davidson's touring platform has undergone major structural and electrical changes over the years. What fits beautifully in a 2026 model will not work on a 2005 model.

When upgrading a Harley Street Glide, the design splits generally fall into three distinct eras:
- 1998–2013 (The Legacy Era): Characterized by the classic Batwing fairing, analog gauges, and single-DIN factory radios that lack modern connectivity.
- 2014–2023 (The Rushmore Era): Introduced the Boom! Box infotainment systems, redesigned inner fairings with different speaker pods, and a highly customized factory EQ curve.
- 2024+ (The Skyline OS Era): Features Harley's latest digital cockpit integration, completely updated fairing speaker mounts, and complex factory electronics.
For a deeper dive into how factory setups differ from aftermarket gear, check out our guide on Understanding Harley Davidson Audio From Factory Systems to Custom Setups.
Upgrading the Legacy 1998-2013 Harley Street Glide Stereo
If you ride a 1998–2013 Street Glide, your factory radio is likely outdated, lacks Bluetooth, and is highly prone to weather damage. Upgrading this legacy fairing with a modern harley street glide stereo is one of the most satisfying projects you can undertake.
For this generation, premium head units like the Soundstream SG.V2 or the Diamond Audio 7" Plug & Play Head Unit are game-changers. These units are designed to slide directly into the older Batwing fairing without requiring custom brackets or dash modifications. They bring advanced features like wireless Apple CarPlay, Android Auto, and high-voltage pre-outs (up to 6V RMS) directly to your older bike.
When upgrading these legacy models, you must match your speaker impedance. Many older factory systems used non-standard ohm ratings, but modern aftermarket head units are designed to work with standard 2-ohm or 4-ohm high-performance speakers.
Modernizing the 2014-2023 and 2024+ Rushmore Platforms
Starting in 2014, Harley-Davidson introduced the Rushmore platform, which heavily integrated the motorcycle's computer systems with the infotainment unit. These newer models require specialized integration.
The factory radio on a 2014–2023 model has a pre-programmed EQ curve designed to make weak factory speakers sound "acceptable" at low volumes. However, when you connect high-performance aftermarket speakers and amplifiers to an unflashed factory radio, this EQ curve causes severe distortion and can quickly destroy your new speakers.
For these platforms, you either need a digital radio flash or a specialized plug-and-play wiring harness that mechanically flattens the factory EQ curve before the signal reaches your amplifier. In the newest 2024+ models running the Skyline OS, physical space inside the fairing is at an absolute premium, making compact Class D amplifiers and slim-profile speakers with neodymium magnets absolutely essential.
Choosing the Right Speakers and Amplifiers for Highway Clarity
Riding a motorcycle is an open-air acoustic challenge. Unlike a car's enclosed cabin, your bike's audio system must constantly battle wind, exhaust rumble, tire friction, and surrounding traffic.

To get clear audio at 75 MPH, you cannot rely on standard car audio equipment. You need high-efficiency, high-output marine-grade gear designed specifically for motorcycles. For an in-depth look at speaker selection, see our comprehensive guide on Speakers for a Harley Davidson.
Selecting Weatherproof Speakers to Fight Wind Noise
When choosing speakers for your fairing, pay close attention to the following specifications:
- Ingress Protection (IP) Rating: Look for speakers with an IP rating of IPx5, IP66, or IPx67. An IP66 rating means the speaker is completely dust-tight and can withstand powerful jets of water—essential for sudden downpours and bike washes.
- Neodymium Magnets: Neodymium is a rare-earth material that is incredibly strong. Speakers built with neodymium magnets are much lighter and have a significantly smaller physical footprint than traditional ferrite-magnet speakers, allowing them to fit into the tight constraints of a Street Glide fairing while delivering massive volume.
- SPL (Sound Pressure Level) and Tuning: Look for speakers engineered for high-efficiency SPL output. Brands like Ground Zero and Hertz tune their motorcycle speakers specifically to project mid-range and high frequencies forward, ensuring your music doesn't get swept away by the wind.
To find the absolute top performers on the market, check out our curated list of the Loudest Motorcycle Speakers.
Matching Amplifiers to Your Harley Street Glide Stereo
No matter how great your speakers are, they will sound weak and distorted without a powerful amplifier. When choosing an amplifier, you must balance power output with your motorcycle's electrical capacity. For a detailed breakdown, read How to Choose the Right Amplifier for Your Harley's Sound System.
- Class D Efficiency: Always choose a Class D amplifier. Class D technology is highly efficient, converting almost all its electrical draw into clean audio power while generating very little heat. This is crucial because your amplifier is mounted inside a sealed fairing with no natural airflow.
- Power Matching (RMS): Always look at the RMS power rating, not the "Max" or "Peak" wattage. You want an amplifier that can comfortably deliver at least 75 to 150 Watts RMS per channel at the correct impedance (usually 2-ohm or 4-ohm) to match your speakers.
- Integration Modules: High-end marine amplifiers, such as the Hertz SP4.900, feature built-in technology like a Universal Speakers Simulator (USS). This module tricks the factory Harley radio into thinking OEM speakers are still connected, preventing diagnostic codes or system shutdowns.
Once installed, it is critical to set your amplifier gains correctly. Using a voltmeter is the most accurate way to prevent clipping. Learn how to do this step-by-step in our guide on Harley Amplifier Setting Gains by Voltage the Correct Way.
Key Features of a Premium Harley Street Glide Stereo Upgrade
A premium harley street glide stereo upgrade does more than just boost your volume; it modernizes your entire cockpit and turns your bike into a true touring command center.
Modern aftermarket source units bring the same level of technology you enjoy in your daily driver directly to your handlebars. To understand the full scope of what is possible, review The Ultimate Guide to Upgrading Your Harley Davidson's Audio System.
Apple CarPlay, Android Auto, and Handlebar Control Retention
Adding wireless Apple CarPlay and Android Auto is a massive safety and convenience upgrade. It allows you to run real-time GPS navigation, manage your music playlists, and view incoming alerts hands-free.
To make this work seamlessly on a motorcycle, look for head units with ultra-bright, high-contrast screens. For example, screens with a 1000 NIT backlight rating remain perfectly visible even under direct, blinding midday sunlight. Touchscreens should also feature glove-friendly capacitive glass so you don't have to pull over and strip off your riding gear just to change a route.
Furthermore, you should never have to take your hands off the grips to adjust your music. Premium head units feature built-in integration modules (like iDataLink Maestro) that allow you to fully retain your factory handlebar thumb controls. You can easily adjust volume, skip tracks, and activate voice commands using your factory switches.
Adding Deep Bass with Saddlebag Subwoofers
While fairing speakers handle the mid-range and high frequencies beautifully, they cannot produce deep, rolling bass at highway speeds. If you want true full-range sound, you need to look at saddlebag subwoofers.
Many riders worry that putting subwoofers in their bags will completely ruin their storage space. However, modern direct-fit subwoofer kits are incredibly compact. By utilizing bass reflex technology, these systems use the natural acoustics of your saddlebags to double the mid-bass output while leaving plenty of room for your gear.
Adding 6x9-inch bag lid speakers or dual 10-inch saddlebag subwoofers fills out the lower frequencies, ensuring your music sounds rich, warm, and complete even when flying down the interstate.
Plug-and-Play Kits vs. Custom Audio Stages
When planning your harley street glide stereo upgrade, you can choose between buying individual components or opting for a pre-configured, plug-and-play kit. For most riders, plug-and-play kits are the superior choice because they take the guesswork out of system integration.
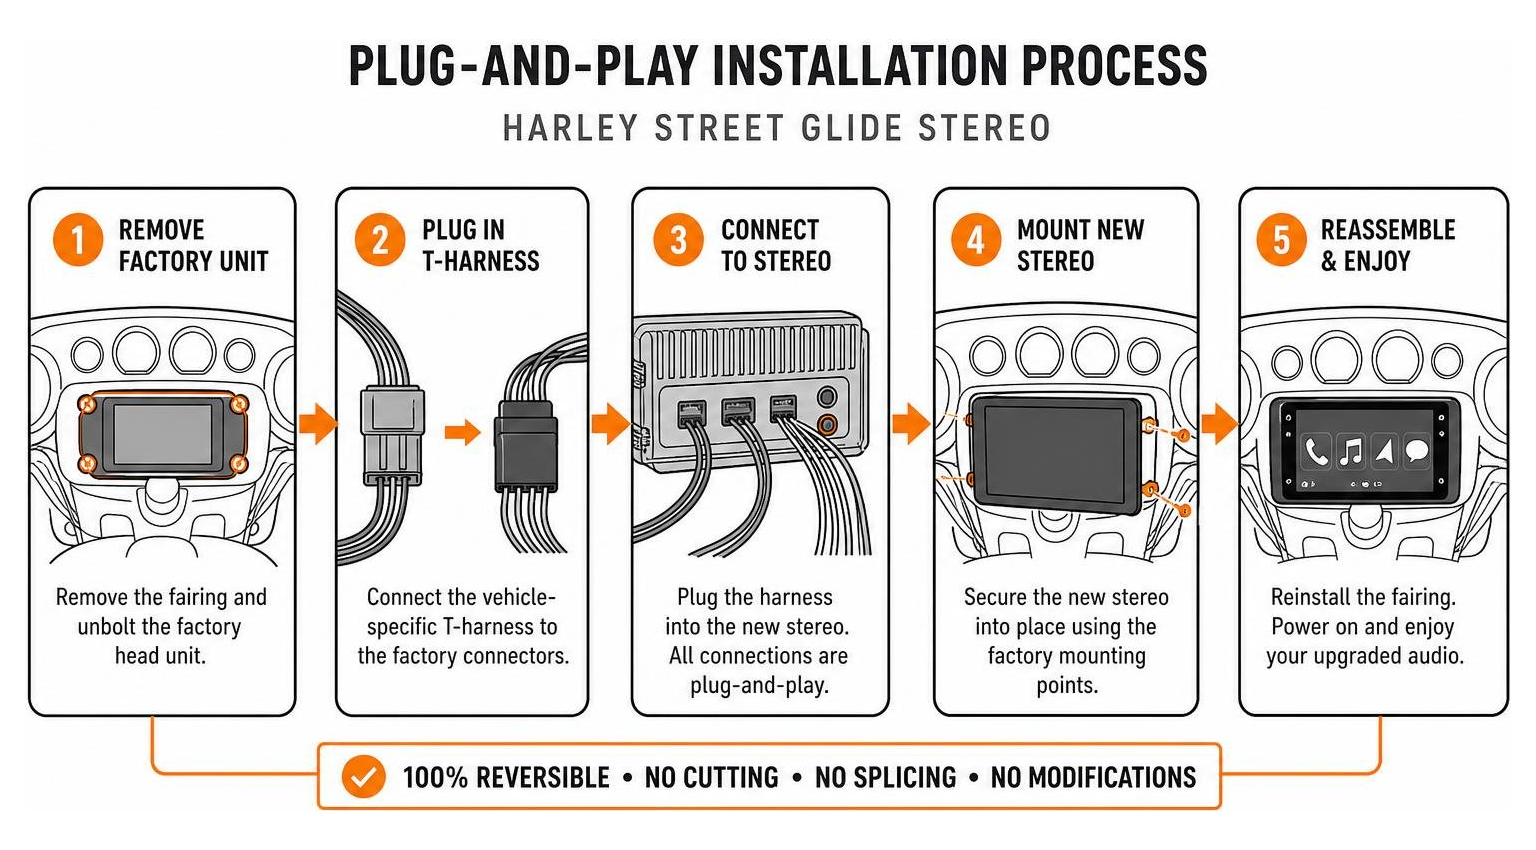
These kits use vehicle-specific T-harnesses that plug directly into your factory wiring. This completely eliminates the need to cut, strip, splice, or solder your bike's original electrical system, making the entire upgrade 100% reversible. If you ever decide to sell your bike, you can easily reinstall the factory radio and speakers.
To see how these kits are physically integrated, take a look at our Harley Fairing Audio Upgrade resources.
Understanding Stage-1, Stage-2, and Stage-3 Audio Kits
Motorcycle audio upgrades are generally categorized into "Stages." Understanding these stages helps you plan your budget and your installation timeline:
| Audio Stage | Typical Components Included | Best For | Power Range |
|---|---|---|---|
| Stage-1 | Replacement head unit & upgraded 6.5" fairing speakers. | Budget-conscious riders wanting modern features and basic clarity. | 50W - 100W RMS |
| Stage-2 | Head unit, 6.5" fairing speakers, and a compact 2-channel or 4-channel amplifier. | Riders wanting high-volume highway clarity over wind and exhaust noise. | 150W - 300W RMS |
| Stage-3 | Head unit, fairing speakers, 4-channel amplifier, and 6x9" saddlebag lid speakers. | True audiophiles wanting full surround-sound coverage on long road trips. | 300W - 1000W+ RMS |
DIY vs. Professional Installation for Harley Audio
Can you install these systems yourself? Absolutely! If you have basic hand tools, some patience, and a plug-and-play kit, you can easily complete a Stage-1 or Stage-2 upgrade in your own garage over a weekend.
However, if you are planning a massive Stage-3 build that requires cutting saddlebag lids, routing heavy-gauge power wires directly to your battery, or installing multiple amplifiers, you must weigh your comfort level with electrical work. For an honest comparison of what to expect, read DIY vs Professional Installation What You Need to Know About Upgrading Your Harley's Audio.
Frequently Asked Questions about Street Glide Audio
Do I need to flash my factory radio when upgrading my Harley Street Glide stereo?
Yes, if you are keeping your 2014–2023 factory Harley head unit and adding an aftermarket amplifier and speakers, a radio flash is highly recommended. The factory radio has an aggressive built-in EQ curve that will distort aftermarket equipment and potentially blow your new speakers. Flattener harnesses can help, but a digital flash is the cleanest way to get a flat audio signal. For a complete walkthrough, refer to our Ultimate Harley Radio Flash Guide for Aftermarket Speakers and Amplifiers.
Can I install a subwoofer on my Street Glide, and where does it fit?
Yes! Subwoofers are typically installed inside the saddlebags. Modern kits use specialized cut-in brackets or entire replacement bag lids designed to house 6x9-inch speakers or compact subwoofers. These systems are engineered to direct the bass frequencies outward toward the rider, providing rich low-end sound without sacrificing all your storage space.
How do I retain my factory handlebar controls with an aftermarket head unit?
To retain your handlebar controls, you must use a compatible interface module, such as the iDataLink Maestro RR or a head unit with a built-in integration module (like the Soundstream SG.V2 or Diamond Audio 7"). These modules translate the digital commands from your handlebar switches into signals the aftermarket radio can understand, allowing for seamless, safe control while riding.
Conclusion
Upgrading your harley street glide stereo is an investment that completely transforms your time on the open road. Whether you are modernizing a classic 1998–2013 batwing bagger or pushing a brand-new Rushmore platform to its absolute acoustic limits, the key to success lies in choosing purpose-built, weather-resistant motorcycle audio gear.
At American Hard Bag, we specialize in helping riders find the perfect plug-and-play configurations tailored specifically to their bikes. Ready to take the next step and build a system that will truly wake up the neighborhood? Dive into The Ultimate Guide to Upgrading Your Harley Davidson's Audio System to plan your dream build today!